Part I is about VBA as a programming language, almost independent of Excel. It discusses concepts found in most programming languages. This part may be a bit boring for programmers, and challenging for non-programmers as you will have to get used to a new way of abstract thinking.
Two major concepts are:
Part I finishes with a challenging programming exercise with debugging (removing code errors) also being part of it. Having an instructor for guidance is handy.
Syntax Sub procedure
Syntax function procedure
Tip: Using some capitals in procedure and variable names prevents typing errors. If you type in the name somewhere else in your code - without capitals - it will automatically change into the name including capitals. If not, then you know you made a typing error.
Give variables logical names and declare their type explicitly.
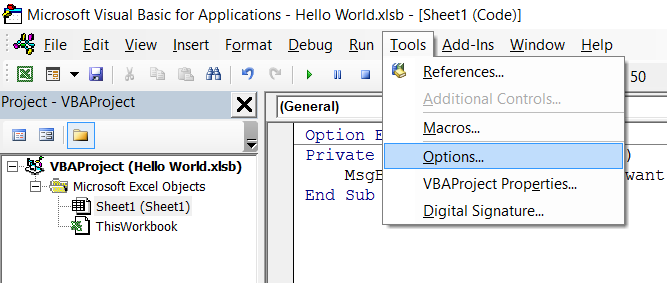
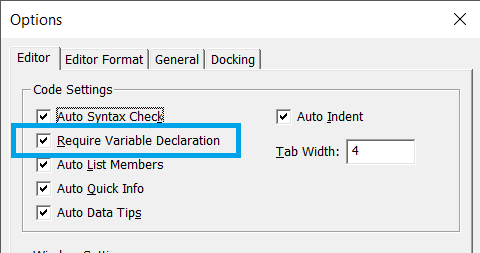
Intermezzo: go to the VBA environment (via ALT-F11), menu Extra → Options, and check Require Variable Declaration. Line
Alternative method is to declare the lowerbound of the array explicitly
Suppose you have the first number to be stored:
Use
Function
With multidimensional array variables
In above Else If-construction you can use variables of different types. In below Select Case-alternative you cannot.
Use
Use
Prime numbers are whole numbers that can only be divided by 1 and by itself (1, 2, 3, 5, 7, 11, 13, 17, 19, 23, etc.).
Follow the instructions and step-by-step approach strictly. Also review the code examples given in previous sections. First, read all steps to get an idea of the approach, then start with step 1. Do not try to create shortcuts and skip a step. Resulting code may not be the most efficient, but that is not the goal of this exercise.
If your program does not work correctly at some time - which is likely to happen - then you will have to debug (= detect and remove code errors). Read next section Debugging.
You will learn the most by trying. And experience the most. Embrace your frustration! 😀
Fed up with embracing your frustration?
Program code for each step is found at the end of this page, in the last section of Appendices.
Two major concepts are:
- Decisions: have the program decide which part of the code will be executed next: if this condition is true, then do this, else do that
- Loops: have the program execute a part of the code multiple times: perform N times action A
Part I finishes with a challenging programming exercise with debugging (removing code errors) also being part of it. Having an instructor for guidance is handy.
Side note: VBA will remain as-is, because Microsoft has stopped further development like 15 years ago.
After completing this course you are able to create VBA procedures in MS Excel.
VBA can be used to
Use Excel standard functionality first, and try to limit the amount of VBA code.
VBA can be used to
- Automate manual actions preventing human error
- Create user defined functions that expand Excel's functionality
- Create responsive user interfaces
- Run an Excel calculation model for varying inputs while storing or accumulating results
- Implement complex algorithms, prototyping, et cetera
Use Excel standard functionality first, and try to limit the amount of VBA code.
- Who maintains the code within your organization?
- If code errors have not been debugged 100% during tests, they may start frustrating users.
- Try to keep calculation logic within Excel formulas.
- Avoid forms, if user input can be entered via regular cells just as well.
Before diving into "theory", let's create a working button first.
Make the Developer ribbon visible, if it is not visible yet. Go to menu File → Options → Customize ribbon. Check Developer in the right screen.

Go to the Developer ribbon → Insert → Command button, in the upper left corner of section ActiveX-controls.
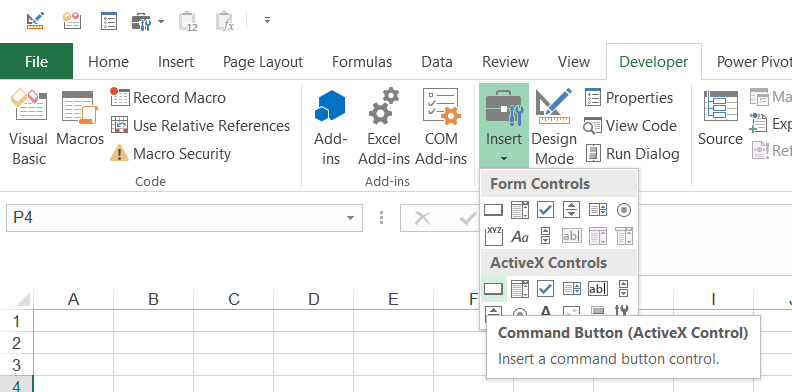
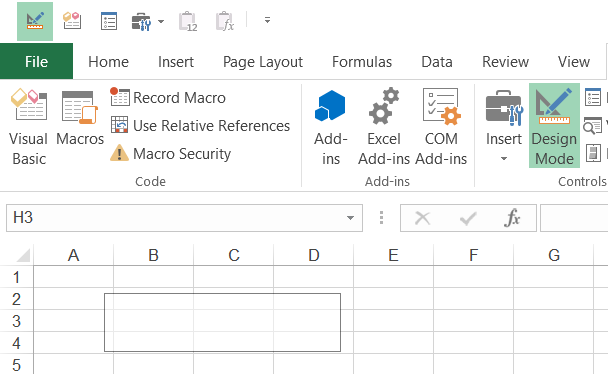
While pressing the mouse left button, draw a rectangle in your worksheet, then release the mouse button.
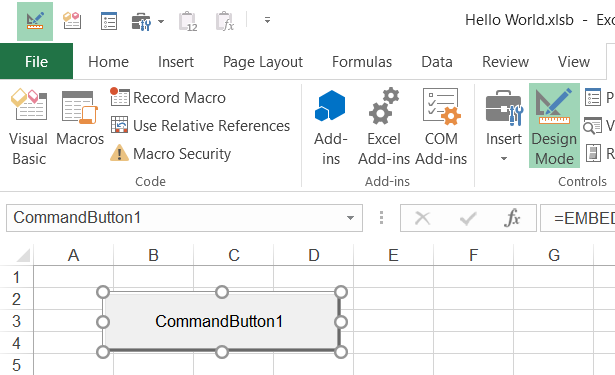
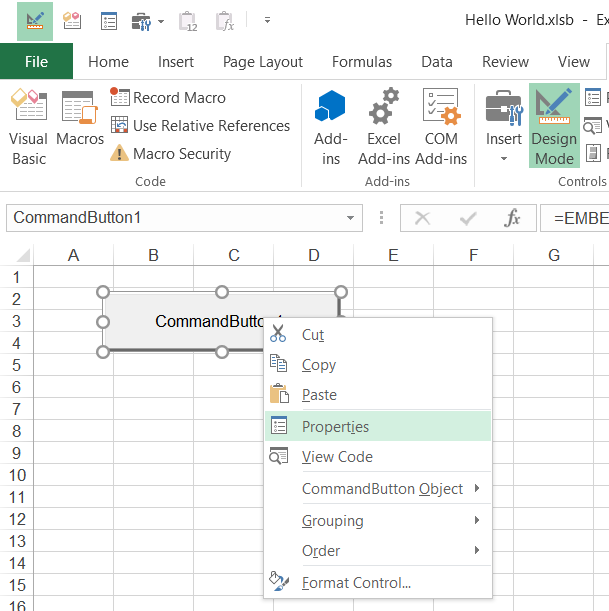
Give the command button a logical Name (the link to VBA code) and Caption (text on the button). This is done in the properties screen, via right mouse click on the command button. Use some capitals in Name and start the name with
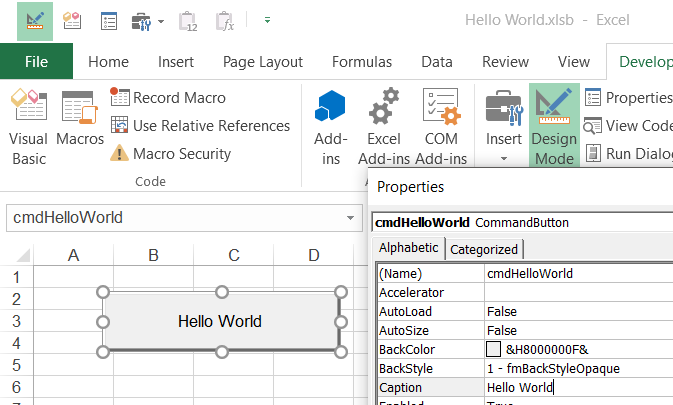
Double click (left) on the command button to jump into the VBA programming environment (or via ALT-F11). Notice that the 'header and footer of the command button' have been generated automatically. You will recognize the button name and you can tell it is a procedure (Sub) to be executed after a mouse click (_Click).

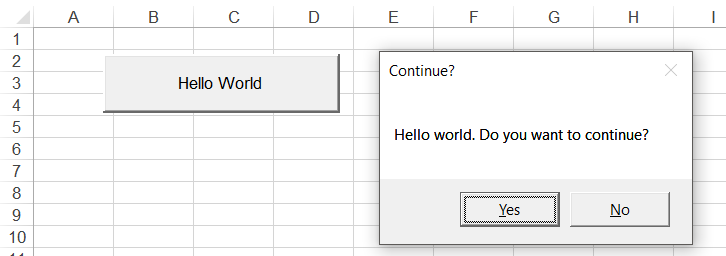
Enter the following code: MsgBox "Hello world. Continue?", vbYesNo, "Continue?". Notice that if you type the comma, a popup list appears with user message options (that can be combined with +). vbYesNo is often used. It creates a Yes and No button on the user message popup screen.

Close the VBA mode (press x at the top right), and exit the Design mode.
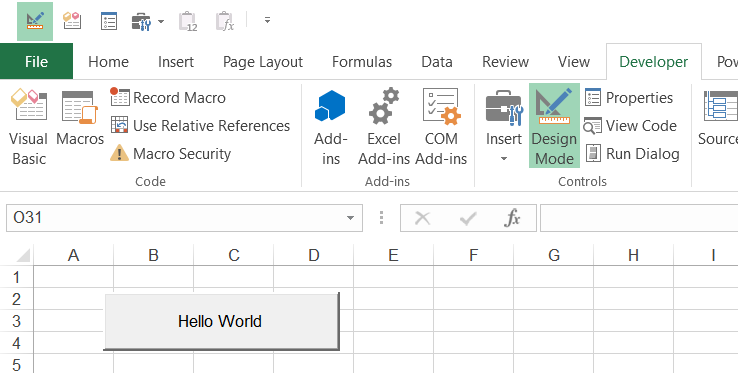
Press your command button. If the 'Hello World' user message appears, then you have earned your first study points.
Save your file as *.xlsm or as *.xlsb file!
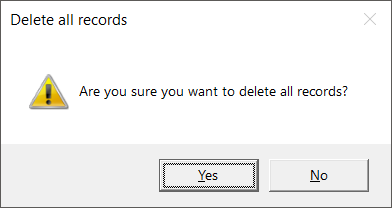
A user message is often used to inform a user a procedure has finished. Below an example of another, often used, type of message: if the user choses no, then the procedure is not executed. This construct will be used in a later exercise.

Exercise: create a command button
We will learn to write VBA code. That code must be executed. Code execution is normally triggered by pressing a button. So, we will create a command button first. Below you see the final result of this exercise.
Make the Developer ribbon visible, if it is not visible yet. Go to menu File → Options → Customize ribbon. Check Developer in the right screen.

Go to the Developer ribbon → Insert → Command button, in the upper left corner of section ActiveX-controls.

While pressing the mouse left button, draw a rectangle in your worksheet, then release the mouse button.


Give the command button a logical Name (the link to VBA code) and Caption (text on the button). This is done in the properties screen, via right mouse click on the command button. Use some capitals in Name and start the name with
cmd
. Some naming conventions: command buttons start with cmd
, option buttons with opt
, check boxes with chk
, etc.

Double click (left) on the command button to jump into the VBA programming environment (or via ALT-F11). Notice that the 'header and footer of the command button' have been generated automatically. You will recognize the button name and you can tell it is a procedure (Sub) to be executed after a mouse click (_Click).

Enter the following code: MsgBox "Hello world. Continue?", vbYesNo, "Continue?". Notice that if you type the comma, a popup list appears with user message options (that can be combined with +). vbYesNo is often used. It creates a Yes and No button on the user message popup screen.

Close the VBA mode (press x at the top right), and exit the Design mode.

Press your command button. If the 'Hello World' user message appears, then you have earned your first study points.
Save your file as *.xlsm or as *.xlsb file!
A user message is often used to inform a user a procedure has finished. Below an example of another, often used, type of message: if the user choses no, then the procedure is not executed. This construct will be used in a later exercise.


Sub procedures and functions - syntax
A Sub procedure performs a task, a Function procedure also gives an output value. The syntax of both is similar. Both use input variables and local variables (temporary memory within a procedure).Syntax Sub procedure
Sub NameProcedure(InputVariable1 As Type,...,InputVariabeleN As Type)
Dim LocalVariable1 As Type
Dim LocalVariableN As Type
instruction(s)
End Sub
Dim LocalVariable1 As Type
Dim LocalVariableN As Type
instruction(s)
End Sub
Syntax function procedure
Function NameProcedure(InputVariable1 As Type,...,InputVariableN As Type) As Type
Dim LocalVariabele1 As Type
Dim LocalVariabeleN As Type
instruction(s)
NameProcedure = LocalVariableM
End Function
Dim LocalVariabele1 As Type
Dim LocalVariabeleN As Type
instruction(s)
NameProcedure = LocalVariableM
End Function
Tip: Using some capitals in procedure and variable names prevents typing errors. If you type in the name somewhere else in your code - without capitals - it will automatically change into the name including capitals. If not, then you know you made a typing error.
Variables
Variables are input and local memory of procedures. The wordDim
meane 'create'. Shown below is a function that sums two integers.
Function Plus(ByVal NumberOne As Integer, ByVal NumberTwo As Integer) As Integer
Dim SumBoth As Integer
SumBoth = NumberOne + NumberTwo
Plus = SumBoth
End Function
Dim SumBoth As Integer
SumBoth = NumberOne + NumberTwo
Plus = SumBoth
End Function
Give variables logical names and declare their type explicitly.
| Variable type | Meaning | Conversion function |
| Integer | Whole numbers between -32.768 and 32.767 | CInt CInt("10")→10 |
| Long | Whole numbers between -2.147.483.648 and 2.147.483.647 | CLong |
| Single | Fractional numbers between -3,402823 E38 and 3,40283 E38 | CSng |
| Double | Fractional numbers between -1,7976931486232 E308 and 1,7976931486232 E308 | CDbl |
| Currency | Fractional numbers between -922.337.203.685.477,5807 and 922.337.203.685.477,5807 (always 4 decimals, no rounding error) | CCur |
| String | Up to 65.000 characters | CStr CStr(10)→"10" |
| Boolean | True or False | CBool |
| Date | 1st of January 100 to 31st of December 9999 | CDate |
| Object/Range | Every object / worksheet cell or ranges | |
| Variant | Variabele that automatically detects its type based on input. Can be a matrix, or Null (empty). Default type, if the type has not been declared explicitly. | CVar |
Intermezzo: go to the VBA environment (via ALT-F11), menu Extra → Options, and check Require Variable Declaration. Line
Option Explicit
will be set automatically each time you create a new file. Each variable has now to be declared explicitly. This reduces the risk of errors.

Array variables
An array variable can be regarded as a list or multidimensional table. Shown below is an example of how to create a table with 100 random numbers. Each element is controlled via its index, here namediNumber
. Standard VBA function Rnd()
draws a random fractional number between 0 and 1.
Dim RandomNumber(100) as Single
Dim iNumber as Integer
For iNumber = 1 to 100
RandomNumber(iNumber)= Rnd()
Next iNumber
An example of a 2-dimensional table with 3 sets of 100 random numbers.Dim iNumber as Integer
For iNumber = 1 to 100
RandomNumber(iNumber)= Rnd()
Next iNumber
Dim RandomNumber(1 to 3, 1 to 100) as Single
Dim iSet as Integer, iNumber as Integer
For iSet = 1 to 3
For iNumber = 1 to 100
RandomNumber(iSet, iNumber)= Rnd()
Next iNumber
Next iSet
RandomNumber(100) in fact contains 101 elements, because 0 is the first index (like in most programming languages). If you want to start index with 1, then add the following at the top of your codeDim iSet as Integer, iNumber as Integer
For iSet = 1 to 3
For iNumber = 1 to 100
RandomNumber(iSet, iNumber)= Rnd()
Next iNumber
Next iSet
Option Explicit
Option Base 1
Alternative method is to declare the lowerbound of the array explicitly
as Dim RandomNumber(1 to 100) as Single
You can make array variables grow dynamically, if their size is unknown upfront. Then do not specify dimensions when declaring the array variable:Dim RandomNumber() as Integer
Suppose you have the first number to be stored:
Redim RandomNumber(1)
RandomNumber(1) = 7
RandomNumber(1) = 7
Use
Preserve
if you want to keep values when redimensioning:Redim Preserve RandomNumber(2)
RandomNumber(2) = 28
RandomNumber(2) = 28
Function
UBound
gives the array length, for example NumberOfRandomNumbers = Ubound(RandomNumber)
With multidimensional array variables
NumberOfRandomNumbersInSet2 = Ubound(RandomNumber,2)
Decisions
Create decisions (conditional program execution) with If Then Else or with Select Case
If condition then
instructions
End If
instructions
End If
If condition Then
instructions1
Else
instructions2
End If
instructions1
Else
instructions2
End If
If inputNumber<10 Then
msgBox "This number is smaller than 10"
Else
msgBox "This number is larger or equal to 10"
End If
msgBox "This number is smaller than 10"
Else
msgBox "This number is larger or equal to 10"
End If
If condition1 Then
instructions1
ElseIf condition2 Then
instructions2
ElseIf condition3 Then
instructions3
End If
instructions1
ElseIf condition2 Then
instructions2
ElseIf condition3 Then
instructions3
End If
In above Else If-construction you can use variables of different types. In below Select Case-alternative you cannot.
Select Case VariableValue
Case 1: instructions1
Case 2,3: instructions2
Case 4 to 10: instructions3
Case Else: instructions4
End Select
Case 1: instructions1
Case 2,3: instructions2
Case 4 to 10: instructions3
Case Else: instructions4
End Select
Select Case strDay
Case "MON": dayNr = 1
Case "TUE": dayNr = 2
Case "WED": dayNr = 3
Case "THU": dayNr = 4
Case "FRI": dayNr = 5
Case "SAT": dayNr = 6
Case "SUN": dayNr = 7
End Select
Case "MON": dayNr = 1
Case "TUE": dayNr = 2
Case "WED": dayNr = 3
Case "THU": dayNr = 4
Case "FRI": dayNr = 5
Case "SAT": dayNr = 6
Case "SUN": dayNr = 7
End Select
Use
And
and Or
and ( )
to combine multiple conditions.
If ((i=1) And (t="abc")) Then ...
If ((i=1) Or (t="abc")) Then ...
If ((i=1) Or (t="abc")) Then ...
Use
Not
to create the opposite condition.
If Not((i=1) and ((b=false) Or (t="abc"))) Then ...
Unconditional loops - For Next
A loop executes the same instructions multiple times. Use For Next if it is known upfront how many times instructions should be executed, for example 10 times.
For i=1 to 10
instructions
Next i
If the step counter should not increase with 1 (default), then specificy step size (note that you can also make it decrease)instructions
Next i
For i=2 to 10 step 2
instructions
Next i
instructions
Next i
For i=20 to 2 step -4
instructions
Next i
Use of For Next in combination with an array variable (Ubound gives the length of an array variable).instructions
Next i
For i = 1 to Ubound(array)
instructions
Next i
instructions
Next i
For Each element In array
instructions
Next element
instructions
Next element
Conditional loops - Do While Loop / Do Until Loop
A loop executes the same instructions several times. Use Do While or Do Until if it is unknown upfront how many times the instructions should be executed.
Do While condition
instructions
Loop
instructions
Loop
Do Until condition
instructions
Loop
In case instructions have to be executed at least once:instructions
Loop
Do
instructions
Loop While condition
instructions
Loop While condition
Do
instructions
Loop Until condition
instructions
Loop Until condition
Exit loops immediately / halfway
Though code-technically less beautiful (regarded sloppy), it can be handy to useexit
to exit loops and procedures immediately.
- End loops: use Exit Forfor an unconditional loop, andExit Dofor a conditional loop
- End procedures: use Exit Subfor a sub procedure, andExit Functionfor a function procedure
- End program: use End
For i = 1 to 100
...
If ThisValue = ValueToFind then Exit For
ContinueSearching
...
Next i
...
If ThisValue = ValueToFind then Exit For
ContinueSearching
...
Next i
Public Sub deleteRecords()
...
If MsgBox("Delete all records?", vbYesNo) = vbNo Then Exit Sub
DeleteAllRecords
...
End Sub
...
If MsgBox("Delete all records?", vbYesNo) = vbNo Then Exit Sub
DeleteAllRecords
...
End Sub
Integral exercise: prime number generator (part I)
In this exercise - that contains many elements of previous sections - you will create a prime number generator.Prime numbers are whole numbers that can only be divided by 1 and by itself (1, 2, 3, 5, 7, 11, 13, 17, 19, 23, etc.).

Follow the instructions and step-by-step approach strictly. Also review the code examples given in previous sections. First, read all steps to get an idea of the approach, then start with step 1. Do not try to create shortcuts and skip a step. Resulting code may not be the most efficient, but that is not the goal of this exercise.
If your program does not work correctly at some time - which is likely to happen - then you will have to debug (= detect and remove code errors). Read next section Debugging.
You will learn the most by trying. And experience the most. Embrace your frustration! 😀
Creating a prime number generator step by step
- Create a command button that starts a procedure showing numbers 1,2,3,4,etc. (each in a separate message) until the user wants to stop
- Create a counter variable named iNumber that increases during execution. Use a Do While loop.
- Use a Msgbox and exit sub to stop.
- Combine text and a variable in a message as follows "Number = " & str(iNumber)
- Create an 'is odd' check
- Use If Then
- Function Mod gives the remainder of a division, e.g.(41 Mod 3) gives 2.
- Create an array named primeNumber and store all odd numbers in it.
- Use a counter variable nPrime.
- Optional: create a dynamically growing array.
- Replace the 'is odd'-check of step 2 by an 'is prime number'-check. Store only prime numbers.
- Use a boolean named isPrimeNumber and initialize its value each time as isPrimeNumber = true.
- Use a For Next loop to check if the current number is divisible by any of the previously stored prime numbers.
- Optional: use Exit For to end this check as soon as it turns out a number is divisible.
Program code for each step is found at the end of this page, in the last section of Appendices.
Debugging
Debugging is detecting and removing code errors (bug = code error).- Debugging is often done using 'break points', points at which the code is interrupted/halted.
- Click in the grey vertical bar at the left of the code to enter a break point.
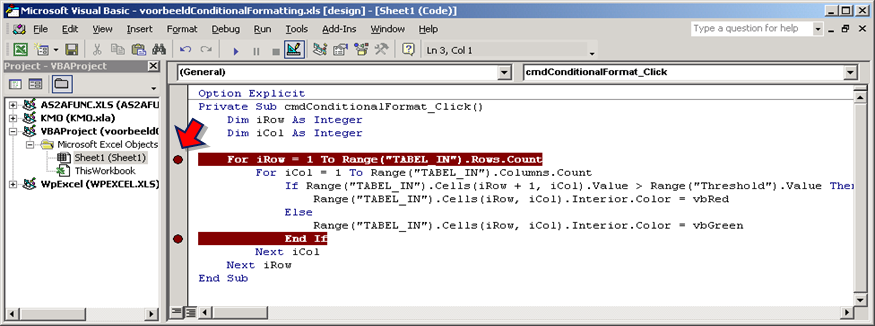
- Put the cursor 'within' the first executable line (not 'within' a variable declaration line starting with Dim) and press F5 or the green "play"-triangle. The program will run until it reaches the first break point.

- Press F8 to execute the next line.
- Press F5 to execute all lines until the next break point.
- Press the blue square to stop.

- Press [BREAK] to kill endless loops.
- Debug by investigating variable values during execution.
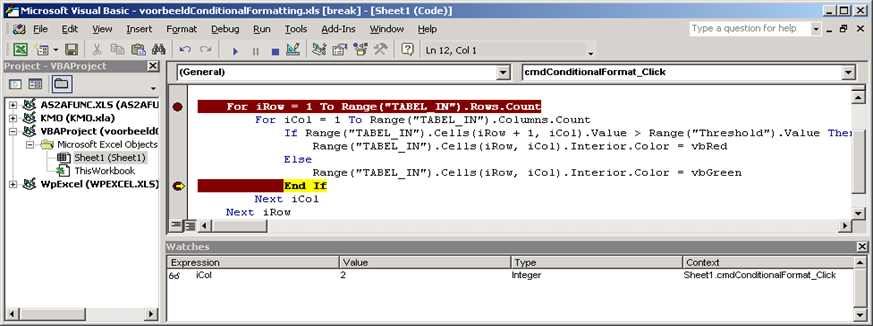
- Method 1. Put the mouse on top of a variable to see its value directly displayed in a small popup screen.

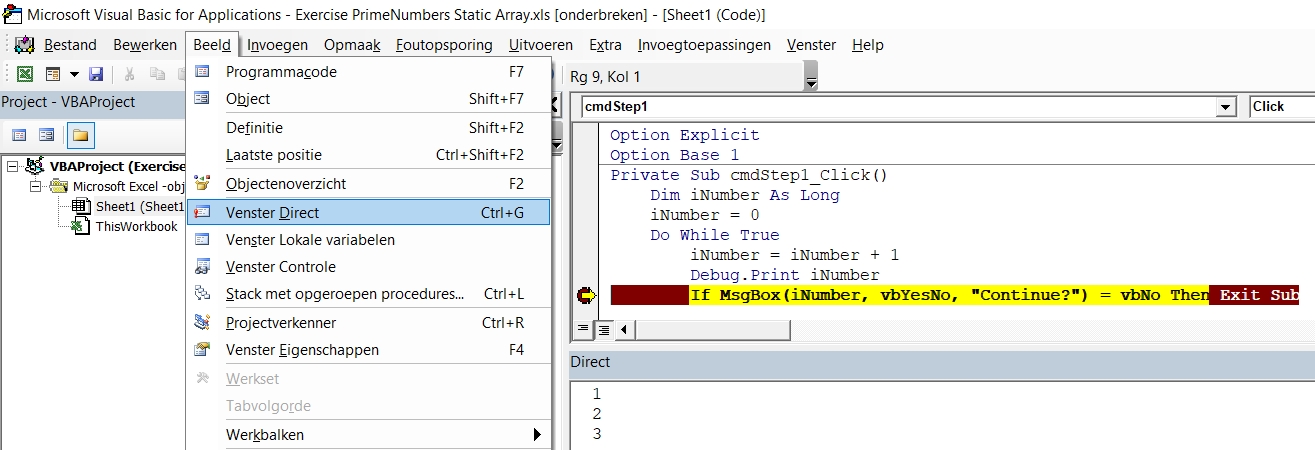
- Method 2. Write variable values to a debug screen via Debug.Printnamed_variable
Open the Immediate Window (menu View → Immediate Window; or press CTRL + G).
Each time the program passes Debug.Print, the Immediate Window is extended with the current value of named_variable.
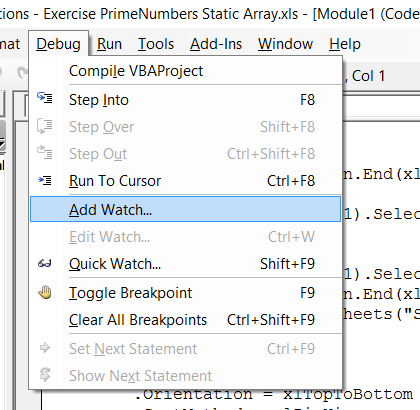
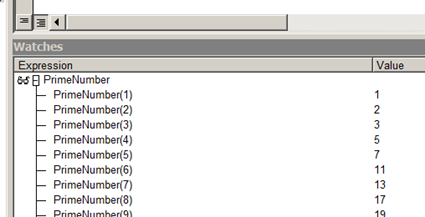
- Method 3. Open a debug screen (menu Debug → Add watch) and add variables. You can view arrays (or complete objects) and expand those in the debug screen.
Part II is about using VBA to interact with Excel. The most important interaction, reading a value from a cell and writing a value to a cell, is easily programmed.
Part II discusses handy methods and properties related to reading/writing values. It is impossible - due to sheer amount - to discuss all methods and properties that can be used within Excel (say, for example, how to change the color of a marker of a chart line of a chart of a sheet). But that does not matter, because by recording a macro you can always generate VBA code and find out what methods/properties are to be used.
Part II contains several small exercises within sections.
Out of scope
In case of multiple worksheets, specify the sheetname
Method I uses a row and column counter to loop through all cells in a range; this gives control over the order. Method II is leaner.
VBA code can be found at different places:
Macro recording often generates 'too much' code
versus
Application.CutCopyMode=false clears the Clipboard.
If you only want to copy data without format and no filters are ever active, you can do the following:
Or if you want to keep date-format or currency-format:
This works faster and has as additional advantage that it bypasses the clipboard, so it uses less RAM.

The example above is a function that calculates the as-the-crow-files-distance between two geographical locations.
On this website there is also an extensive example (including downloadable file) of a user defined function that interpolates within a 2-dimensional table interpolateXY example
This exercise is just an exercise. The task itself can be done without VBA, with the following array formula:
Array formulas are not that easy to create and tend to become 'unreadable'. On the other hand, they are standard Excel and often run faster than a VBA-function.
 They come in two 'flavors': Forms en ActiveX.
Part II discusses handy methods and properties related to reading/writing values. It is impossible - due to sheer amount - to discuss all methods and properties that can be used within Excel (say, for example, how to change the color of a marker of a chart line of a chart of a sheet). But that does not matter, because by recording a macro you can always generate VBA code and find out what methods/properties are to be used.
Part II contains several small exercises within sections.
Out of scope
- Creating a VBA user form. Though a user form can add value, standard sheet functionality is often enough. It starts with a well-designed/clean-structured worksheet. And it seems that novice VBA programmers tend to overdo the use of VBA, in their VBA enthusiasm.
- Controls other than button, check box, and option box (these last two only require reading/writing cell value).
Side note: complex processes cannot be macro recorded. For example, having MS Excel send an email via MS Outlook with a tailormade text and pdf invoice. Which is possible. All Microsoft Office applications can work together via VBA. It is outside the scope of this course, because it involves more than MS Excel only. If you search on the internet, you will find all you need. Nowadays internet is a rich source when it comes to programming.
Reading - Direct cell reference versus cell reference via range name
Direct cell reference✘
Two alternatives
If you move the complete table,
the code will give a wrong answer
so avoid direct cell reference!
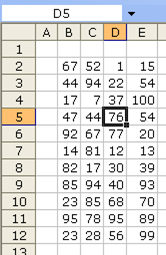
Two alternatives
X = Range("D5").Value
→ X becomes 76X = Cells(5,4).Value
→ X becomes 76with 5 = row number, 4 = column number
If you move the complete table,
the code will give a wrong answer
so avoid direct cell reference!

Cell reference via range name (cell with name)✓
Reference to the cell with a name
Reference to another cell via the cell with a name
If you move the complete table, the code will still give the correct answer,
as long as range name upperLeft and Table refer to the correct range.
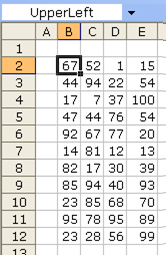
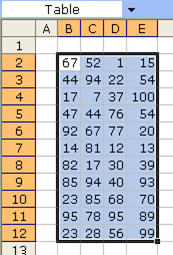
Reference to the cell with a name
X = Range("UpperLeft").Value
→ X becomes 67.Reference to another cell via the cell with a name
X = Range("Upperleft").Cells(5,4).Value
→ X becomes 20X = Range("Upperleft").Offset(4,3).Value
→ X becomes 20X = Range("Table").Cells(5,4).Value
→ X becomes 20If you move the complete table, the code will still give the correct answer,
as long as range name upperLeft and Table refer to the correct range.


Writing
Writing to a worksheet works the other way round, so for exampleRange("Table").Cells(5,4).Value = X
In case of multiple worksheets, specify the sheetname
Sheets("Sheet1").Range("UpperLeft").Value = X
Exercise
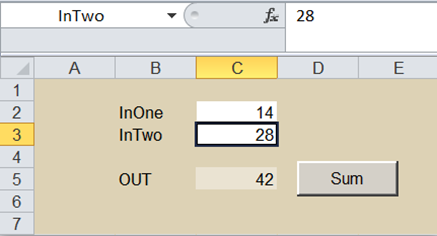
Create a single line program that reads values of two input cells named InOne en InTwo and writes the sum of both values to a cell named OUT after pressing a command button Sum.
Exercise: writing prime numbers to sheet
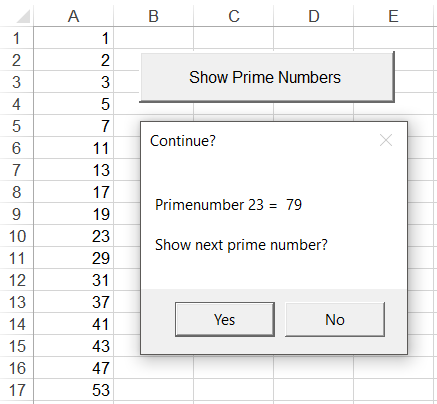
Revisit the prime number generator. Write prime numbers to the worksheet during execution. Do this in such a way the user can drag and drop the numbers somewhere else, so next time you execute the program the generated numbers will start appearing there.
Often used Range properties and methods
Range("TABLE").Value = 7 | Gives all cells in range TABLE a value of 7 |
Range("TABLE") = 7 | .Value is default so you may leave it out |
Range("TABLE").Value2 = = Range("Copy").Value2 | Gives all cells in range TABLE a value of 7. Value2 captures value only, whereas value captures value plus currency format plus date format. Value2 works faster. |
Range("TABLE").Copy | Copies all |
Range("TABLE").Paste | Pastes all |
Range("TABLE").PasteSpecial xlPasteValues | Pastes values only |
Range("TABLE").PasteSpecial xlPasteFormulas | Pastes formulas only |
Range("TABLE").PasteSpecial xlPasteFormats | Pastes formats only |
Range("TABLE").Value = "" | Removes all values |
Range("TABLE").ClearContents | Removes all values |
Range("TABLE").Clear | Removes everything including formats and protection settings (sometimes unwanted) |
Range("TABLE").Rows.Count / .Columns.Count | Gives the number of rows/columns of a range |
Range("B:B").EntireColumn.Hidden = true/false | Hides/shows column(s) |
Range("5:9").EntireRow.Hidden = true/false For Each C In Range("ShowHide") C.EntireRow.Hidden = (C.Value=0) Next C | Hides/shows row(s) Handy to create a range with a formula that becomes 0 if a row should be hidden, 1 if a row should be visible. Then, simply loop through this formula range to hide/unhide rows. (Note: faster VBA method possible, but this requires longer and more advanced code.) |
Range("TABLE").SpecialCells(xlCellTypeVisible).Value = 7 | Gives all visible cells a value of 7. Handy in combination with autofilter. |
Range("A1").CurrentRegion = 7 | Gives all cells connected to range A1 a value of 7 |
Range("A1:A100").Offset(row,column).value = 7 | Works like standard function OFFSET. With Offset you jump to other cell(s) row rows further and column columns further. Negative values means a jump backwards. |
Range("A1").Cells(row,column).value = 7 | Cells lijkt op offset maar start in cel zelf: Range("A1").Cells(1,1) points to Range("A1") |
Range("A:A").Delete Range("A1:A100,C1:C100").Delete | Deletes a range Multiple ranges at once is also possible. |
For i = 1 To Sheets.Count Sheets(i).Range("A1") = 9 Next i1 | Looping through all sheets |
Resizing a selected range is done by
Range("A1").Resize(number_of_rows,number_of_columns)
Range and Loops
Method I
Dim iRow As Long
Dim iCol As Long
Dim R As Range
Set R = Range("MyTable")
For iRow = 1 to R.Rows.Count
For iCol = 1 to R.Columns.Count
R.Cells(iRow,iCol).Value="hallo"
Next iCol
Next iRow
Dim iCol As Long
Dim R As Range
Set R = Range("MyTable")
For iRow = 1 to R.Rows.Count
For iCol = 1 to R.Columns.Count
R.Cells(iRow,iCol).Value="hallo"
Next iCol
Next iRow
Method II
Dim C As Range
Dim R As Range
Set R = Range("MyTable")
For Each C in R
C.Value = "hallo"
Next C
Dim R As Range
Set R = Range("MyTable")
For Each C in R
C.Value = "hallo"
Next C
Method I uses a row and column counter to loop through all cells in a range; this gives control over the order. Method II is leaner.
Exercise: hiding rows and columns
Fill a range of 5 rows and 5 columns with random numbers between 1 and 10. Create a button that hides all rows and columns with a sum less than 15. Create another button that shows the full table again. Both should keep functioning if the number of rows and columns would change.Project explorer
Go to the VBA editor. If you do not see the explorer at the left, go to menu View → Project explorer (or press CTRL+R).VBA code can be found at different places:
- Sheet1, Sheet2, etc. contain ('private') procedures that logically belong to the sheet (with command buttons in the sheet)
- ThisWorkbook contains procedures that are executed when opening or closing the file (Private Sub Workbook_Open en Workbook_Close).

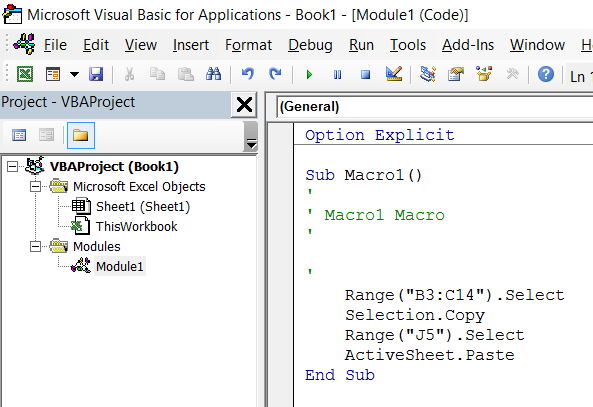
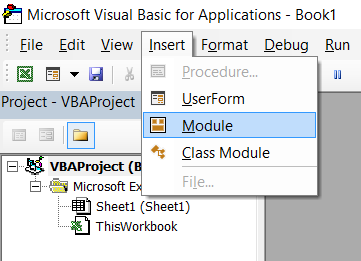
- Module1, Module2, etc. contain procedures usable throughout the whole file. Recorded macro code is found in a module (next chapter). Recording a macro will automatically create a module. User defined functions must be put within a module.. Modules can be insterted manually via VBA editor menu Insert.

Macro recording
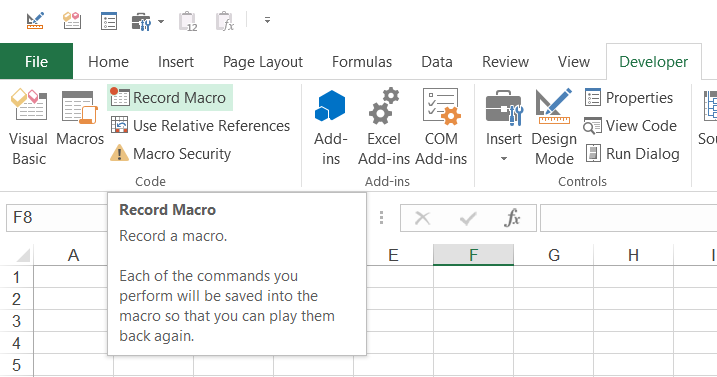
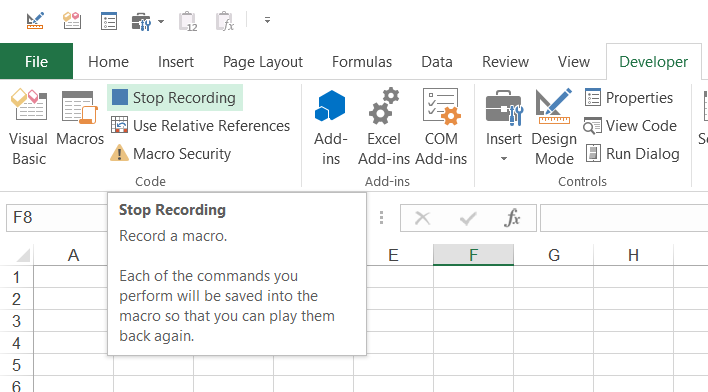
If you do not know how to convert a manual procedure into VBA code, it is handy to record a macro (Excel knows too many methods/object/properties to learn them all by heart). All manual tasks performed during the macro recording are automatically written into a sub procedure within a module. You can study that code afterwards or adjust it to your needs.


Macro recording often generates 'too much' code
Range("B3:C14").Select
Selection.Copy
Range("J5").Select
ActiveSheet.Paste
Application.CutCopyMode=false
Selection.Copy
Range("J5").Select
ActiveSheet.Paste
Application.CutCopyMode=false
versus
Range("B3:C14").Copy Destination:=Range("J5")
Application.CutCopyMode=false
Application.CutCopyMode=false
Application.CutCopyMode=false clears the Clipboard.
If you only want to copy data without format and no filters are ever active, you can do the following:
Range("J5:J16").value2=Range("B3:C14").value2
Or if you want to keep date-format or currency-format:
Range("J5:J16").value=Range("B3:C14").value
This works faster and has as additional advantage that it bypasses the clipboard, so it uses less RAM.
Exercise: setting autofilter
Create a table with data. Create a command button that sets the autofilter in a very specific way. Create another command button that clears the filter settings (without removing the filter as such).User defined function
You can create your own Excel function as aPublic Function
in a module. Add modules via VBA-editor menu Insert. Apart from sitting in a module, the functions themselves are identical to other VBA function procedures.- Advantages: you can add missing functionality. You can create smaller/better readable files.
- Diadvantages: user defined functions run slower than standard functions. Users may have to activate macro's. Sometimes they are not aware of macro's being deactivated, or do not know how to activate them (via File → Options → Trust center → Macro settings).


The example above is a function that calculates the as-the-crow-files-distance between two geographical locations.
On this website there is also an extensive example (including downloadable file) of a user defined function that interpolates within a 2-dimensional table interpolateXY example
Exercise: create a user defined function closestLocation
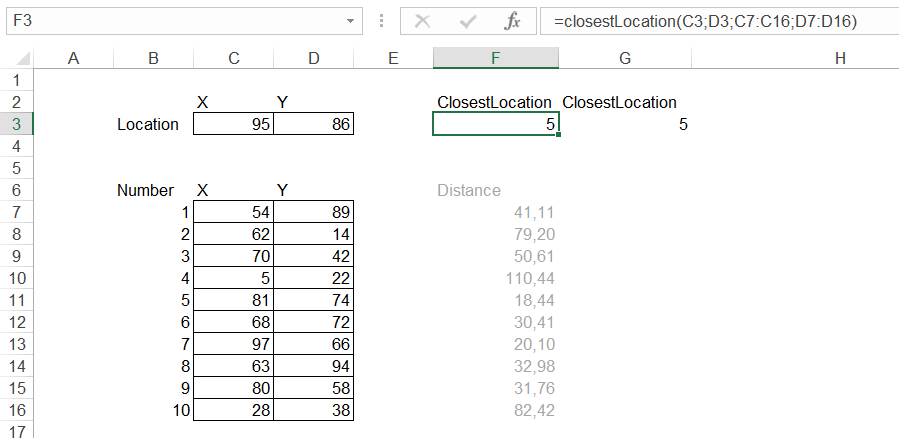
Create a table with fields: Number, X, Y. Create 10 random locations. Create two input cells above the table: X and Y. Create a function that gives the number of the location closest to X,Y as a result.
This exercise is just an exercise. The task itself can be done without VBA, with the following array formula:
{=MATCH(MIN(SQRT((C7:C16-C3)^2+(D7:D16-D3)^2));SQRT((C7:C16-C3)^2+(D7:D16-D3)^2);0)}
Array formulas are not that easy to create and tend to become 'unreadable'. On the other hand, they are standard Excel and often run faster than a VBA-function.
Option buttons and check boxes
Besides command buttons you will often see option buttons and check boxes in user interfaces.

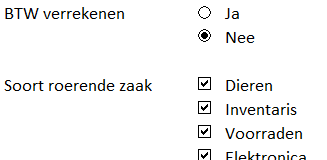
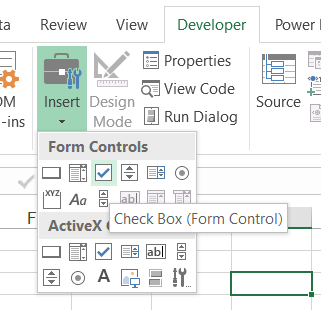
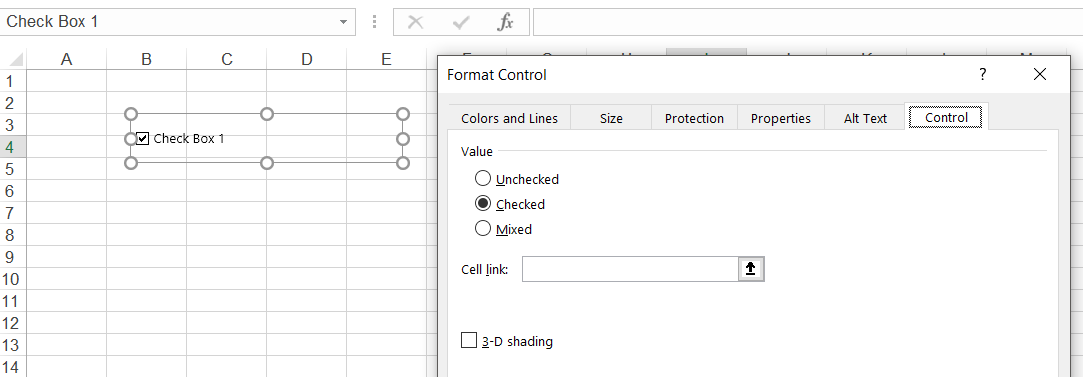
 They come in two 'flavors': Forms en ActiveX.
- Forms: can be read indirectly and are controlled via its linked cell on the worksheet (see picture). Reading from / writing to cell - as discussed in the first section this chapter - is all you need!
- ActiveX: can be read directly and controlled by VBA code (e.g. Me.chkDieren = true).
How to convert an ActiveX button into a Forms button
- Given an ActiveX button and code
Private Sub cmdHelloMsg_Click()
MsgBox "hello"
End Sub
- Change the word Private to Public
Public Sub cmdHelloMsg_Click()
MsgBox "hello"
End Sub
- Create a Forms button and assign the code. This Assign macro screen opens up automatically during the butoon creation process. Remove the ActiveX button.
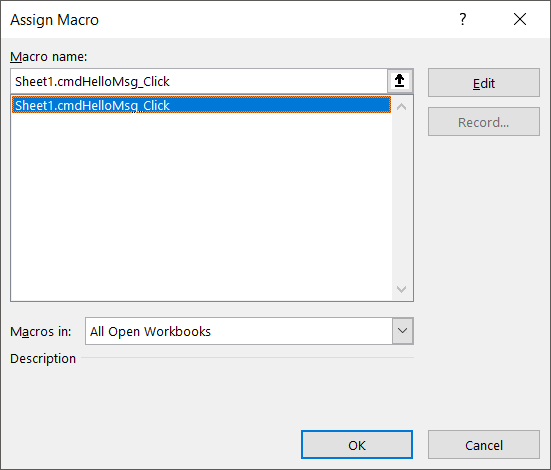
Exercise - Link VBA code to a Forms command button
Note that in the first exercise you have created an ActiveX command button. This was handy because the syntax of the sub procedure was generated automatically. Now, create a Forms command button and link it to the code as follows. Change the Sub procedure from Private into Public. Select the Forms button → right mouse click → Assign macro → select the sub procedure.Exercise - Link VBA code to Forms option button and check box
Create a button that gives a user message with the value of the option button and selection box.Speed up code
- Use a variable to refer multiple times to a specific range. This keeps the code shorter as well.
dim R as Range
Set R = Sheets("SheetXYZ").Range("InvoerXYZ")
R.value=7
- Prevent screen refresh during execution / writing of values to the worksheet
Application.ScreenUpdating = false
- Prevent recalculation when writing values to the worksheet
Application.Calculation = xlCalculationManualDo While ...
First write all values to the worksheet
Recalculate just once:Calculate
Store outcomes
Eventually show the progress:Application.StatusBar = "Busy calculating item " & str(iItem)
Loop
Reactivate regular Excel behavior at the end of the procedure:Application.Calculation = xlCalculationAutomatic
Application.ScreenUpdating = true
Application.StatusBar = ""
- Prevent page break 'bug'
ActiveSheet.DisplayPageBreaks = False
- Get rid of any linked pictures, as these cause extreme delay.
- Use (array) variables instead of the worksheet itself to store data (temporarily) during execution. Only do this if calculation time remains too long, after having done all of the above, because this option means much more programming work.
- Note that it may also be your workbook formulas that cause the workbook to become (too) slow!!
Often seen are too many, non-optimized VLOOKUPs to bring over data. If you really want to speed up VLOOKUPs, then sort your data and use VLOOKUPs with argument 'range lookup' set to TRUE, using a two-step-approach: first VLOOKUP on the key-column of the search table itself and check if this VLOOKUP outcome brings the key itself (so you know data is available in that search table), and if so then VLOOKUP once more to bring over data itself. For example: searching 50,000 records requires only 2 (two-step-approach) x 16 steps (as 216 > 50,000) compared to 25,000 on average, so thousand times faster.
- Beware: if your file calculates extremely slow - for whatever reason - then it may happen that VBA already continues before all calculations have finished, resulting in wrong outcomes. To make VBA wait until all calculations have finished, you can use the following code:
Application.Calculation = xlCalculationAutomatic
Application.Calculate
Do Until (Application.CalculationState = xlDone)
DoEvents
Loop
Part III shortly discusses various topics.
Activate autofilter of a table
Deactivating autofilters is necessary if you want to copy-paste all data.
Deactivate autofilter of current worksheet. Note: this does not deactivate filters from tables on the sheet!
Deactivate autofilter of a specific table on current worksheet
Remove autofilter (if existing) of a named sheet
Looping through multiple input files


Short version
Longer version, more 'by the book' with regard to the Do While condition
String functions
- left("hello",3)→ "hel" = gives 3 left characters
- right("hello",2)→ "lo" = gives 2 right characters
- mid("hello",3,2)→ "ll" = gives 2 characters, starting with the 3rd
- instr("hello","el")→ 2 = gives the start position of the searched substring within the string. If the result is 0, then substring is not found.
- "hello" & " and good bye"→ "hello and good bye" = concatenate text
- trim(" hello ")→ "hello" = remove spaces around a word
- Ucase("hello")→ "HELLO" = convert to uppercase/capitals
- Lcase("HELLO")→ "hello" = convert to lowercase
- Format(0.8954,"00.00%")→ 89.45% = create specific text format
Error handling
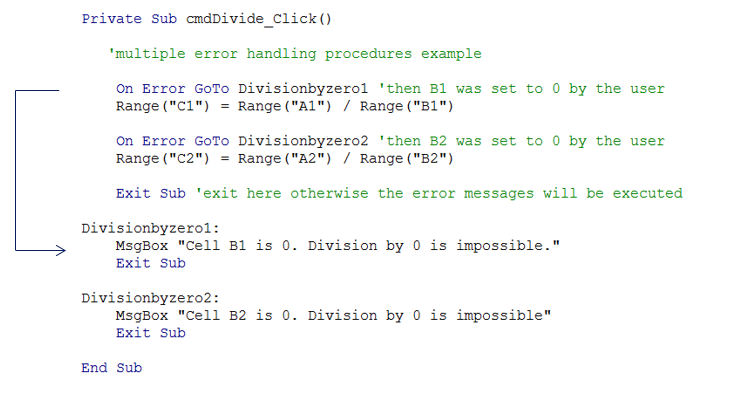
You can useGoTo
to 'jump' to another place within the code, skipping part of the code. This is often combined with On Error
(and Exit Sub
) to program specific error handling routines.
Autofilters
Activate autofilter of active sheet (filter on two columns)
ActiveSheet.Range("$B$3:$D$8").AutoFilter Field:=2, Criteria1:="2"
ActiveSheet.Range("$B$3:$D$8").AutoFilter Field:=3, Criteria1:="5"
ActiveSheet.Range("$B$3:$D$8").AutoFilter Field:=3, Criteria1:="5"
Activate autofilter of a table
ActiveSheet.ListObjects("tableTest").Range.AutoFilter Field:=3, Criteria1:="3"
Deactivating autofilters is necessary if you want to copy-paste all data.
Deactivate autofilter of current worksheet. Note: this does not deactivate filters from tables on the sheet!
If Me.FilterMode Then
Me.ShowAllData
End If
Me.ShowAllData
End If
Deactivate autofilter of a specific table on current worksheet
If Me.ListObjects("tabTest").ShowAutoFilter Then
Me.ListObjects("tabTest").AutoFilter.ShowAllData
End If
Me.ListObjects("tabTest").AutoFilter.ShowAllData
End If
Remove autofilter (if existing) of a named sheet
If Sheets("test").AutoFilterMode Then Sheets("test").Cells.AutoFilter
Read from another MS Excel file
- Deactivate autofilters if you use .copy and .paste and you want to copy all data.
- Clear old values from the copy-to-range first if you are using flexible ranges (otherwise old data will remain at the end if the new data set is shorter).
Dim ThisApp As String
Dim ThatApp As String
Dim fileName as string
ThisApp = ActiveWorkbook.Name
fileName="C:\test.xlsb"
Workbooks.Open fileName
ThatApp = ActiveWorkbook.Name
Workbooks(ThisApp).Sheets("Sheet1").Range("A1:C10").Value2 = Workbooks(ThatApp).Sheets("Sheet1").Range("A1:C10").Value2
Windows(ThatApp).Close
Dim ThatApp As String
Dim fileName as string
ThisApp = ActiveWorkbook.Name
fileName="C:\test.xlsb"
Workbooks.Open fileName
ThatApp = ActiveWorkbook.Name
Workbooks(ThisApp).Sheets("Sheet1").Range("A1:C10").Value2 = Workbooks(ThatApp).Sheets("Sheet1").Range("A1:C10").Value2
Windows(ThatApp).Close
Write to new MS Excel file
Dim wb
Dim dest
Set wb = ActiveWorkbook
Set dest = Workbooks.Add(xlWBATWorksheet)
wb.Sheets("Sheet1").Range("A1:M1000").Copy
dest.ActiveSheet.Paste
Application.CutCopyMode = False
Application.DisplayAlerts = False 'do not show message that asks if you want to replace an existing file
dest.SaveAs "C:\test.xlsb", FileFormat:=50 '50=xlsb / 51=xlsx
dest.Close
Application.DisplayAlerts = True
Read from .csv file(s)
Dim fileName as string
Dim fileNumber
Dim textLine as string
Dim i as long
fileName="C:\test.csv"
fileNumber = FreeFile
Open fileName For Input As #fileNumber
i = 1
Do Until EOF(fileNumber)
Line Input #fileNumber, textLine
Sheets("CSV").Cells(i, 1) = textLine
i = i + 1
Loop
Close #fileNumber
Sheets("CSV").Columns("A:A").Select
Selection.TextToColumns Destination:=Sheets("CSV").Range("A1"), DataType:=xlDelimited, TextQualifier:=xlDoubleQuote, ConsecutiveDelimiter:=False, Tab:=False, Semicolon:=True, Comma:=False, Space:=False, Other:=False, TrailingMinusNumbers:=True
Looping through multiple input files
Dim thisFile As String
thisFile = Dir("C:\*.xlsx")
Do While (thisFile <> "")
MsgBox thisFile
'...process the file...
thisFile = Dir
Loop
thisFile = Dir("C:\*.xlsx")
Do While (thisFile <> "")
MsgBox thisFile
'...process the file...
thisFile = Dir
Loop
Write to .csv file
Dim FileNumber
Dim ExportFilename as String
Dim textLine as string
Dim iRow as Long
FileNumber = FreeFile
ExportFilename = "c:\test.csv"
Open ExportFilename For Output As #FileNumber
For iRow = 1 To Range("A1").CurrentRegion.Rows.Count
textLine = Cells(iRow, 1).Value2
Print #FileNumber, textLine
Next
Close #FileNumber
A double click procedure with file selection window
Private Sub Worksheet_BeforeDoubleClick(ByVal Target As Range, Cancel As Boolean)
If Target.Cells(1, 1).Address = Range("inputfile1").Address Then
Dim FilesToRead
On Error GoTo exitSub
FilesToRead = Application.GetOpenFilename("(*.xlsb),*.xlsb", MultiSelect:=False)
If FilesToRead = False Then Exit Sub
Range("inputfile1").Value = FilesToRead
End If
exitSub:
End Sub
If Target.Cells(1, 1).Address = Range("inputfile1").Address Then
Dim FilesToRead
On Error GoTo exitSub
FilesToRead = Application.GetOpenFilename("(*.xlsb),*.xlsb", MultiSelect:=False)
If FilesToRead = False Then Exit Sub
Range("inputfile1").Value = FilesToRead
End If
exitSub:
End Sub

Constants
You can create variables as constants.
In a worksheet - to be used in that worksheet:
In a module - to be used in the whole file:
Const conPi = 3.14159
In a module - to be used in the whole file:
Public Const conPi = 3.14159
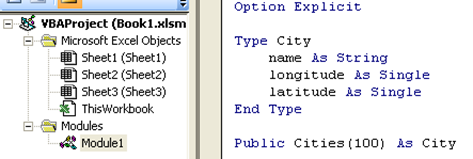
User defined variables
You can define your own variable types, for example if data belongs together:
Cities(1).name = "Haarlem"
Cities(1).longitude = 4.666
Cities(1).latitude = 52.353
Cities(2).name = "Alphen"
Cities(2).longitude = 4.662
Cities(2).latitude = 52.128
Cities(1).longitude = 4.666
Cities(1).latitude = 52.353
Cities(2).name = "Alphen"
Cities(2).longitude = 4.662
Cities(2).latitude = 52.128
Miscellaneous
- With WorksheetFunction.you can call standard functions.
For example:XX = WorksheetFunction.RandBetween(1,9)→ Whole number XX (integer) gets a random value between 1 and 9.
- Use IsError(C.Value)orIsEmpty(C.Value)to check input beforehand / detect invalid input.
- After a .Pasteor.PasteSpecialadd the codeApplication.CutCopyMode = Falseto empty the clipboard and prevent RAM usage to increase.
Instead of copying you can transfer values directly (R1.Value = R2.Value) to bypass the clipboard. However, no filters should ever be active/relevant, because those are ignored. All data is copied, not data of visible cells only! Even faster is (R1.Value2 = R2.Value2) because it ignores date and currency formats and copies just the underlying numerical values.
The same can be done with formulas, but take care: you must copy to the original formula as well to make the formulas on further rows below link to the correct input cells (so not 1 line below the original formula and further below). This direct method may fail (if rows in between are invisible). It is safer to use.Paste.
- You can refer to the current active sheet with MeorActiveSheete.g.Me.range("Table").value=""
-
Workbook.RefreshAllrefreshes all external links and pivot tables.
- Use Application.International(xlDecimalSeparator)to get the actual decimal separator used by Excel (and ignore Application.DecimalSeparator)
- Use & _to cut off extremely long VBA code lines so you can view them without having to scroll to the right
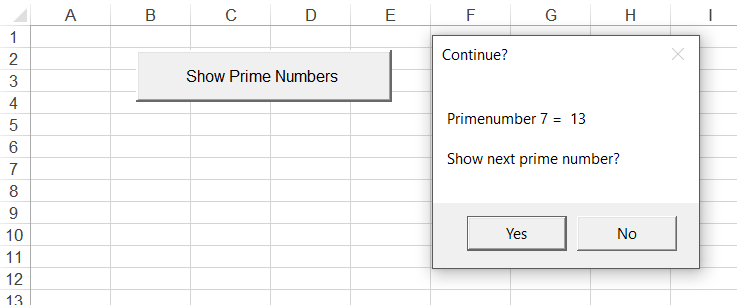
If MsgBox("Primenumber" & Str(nPrime) & " = " Str(iNumber) & _
"Show next prime number?", vbYesNo) = vbNo Then End
- Repeatable simulation (handy for debugging)
Rndgives a random number uniformly distributed [0,1>. ThusInt((9 * Rnd) + 1)gives a random whole number between 1 en 9.
Randomizeinitializes the random generator with a random seed
Use the next two line construct - with a fixed value for FixedRandomSeed - to create a simulation that brings the same random numbers each time you restart the simulation: handy for debugging.
Rnd -1
Randomize (FixedRandomSeed)
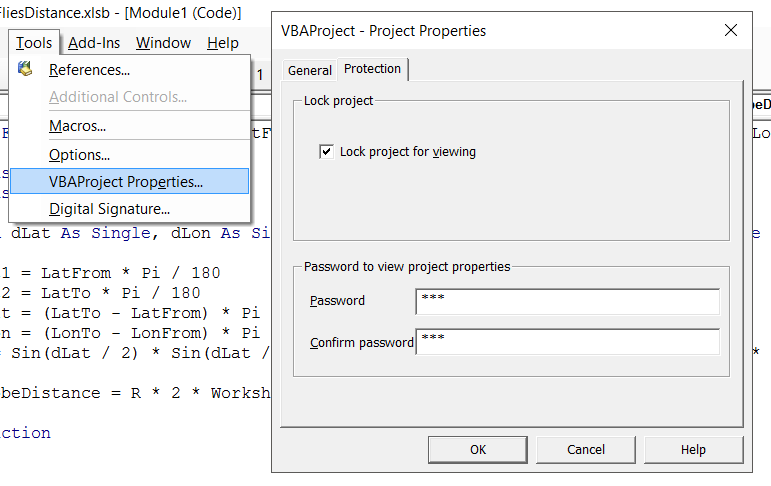
- You may want to protect your VBA code, optionally with a password (do not forget to tell someone else this password, just in case).
Result step 1
Short version
Private Sub cmdStep1_Click()
Dim iNumber As Long
iNumber = 0
Do While True
iNumber = iNumber + 1
If MsgBox(iNumber, vbYesNo, "Continue?") = vbNo Then Exit Sub
Loop
End Sub
Dim iNumber As Long
iNumber = 0
Do While True
iNumber = iNumber + 1
If MsgBox(iNumber, vbYesNo, "Continue?") = vbNo Then Exit Sub
Loop
End Sub
Longer version, more 'by the book' with regard to the Do While condition
Private Sub cmdStep1_Click()
Dim iNumber As Long
Dim doContinue as boolean
iNumber = 0
doContinue = true
Do While doContinue = True
iNumber = iNumber + 1
If MsgBox(iNumber, vbYesNo, "Continue?") = vbNo Then doContinue=false
Loop
End Sub
Dim iNumber As Long
Dim doContinue as boolean
iNumber = 0
doContinue = true
Do While doContinue = True
iNumber = iNumber + 1
If MsgBox(iNumber, vbYesNo, "Continue?") = vbNo Then doContinue=false
Loop
End Sub
Result step 2
Private Sub cmdStep2_Click()
Dim iNumber As Long
Dim isOdd As Boolean
iNumber = 0
Do While True
iNumber = iNumber + 1
isOdd = True
If (iNumber Mod 2 = 0) Then isOdd = False
If isOdd Then
If MsgBox(iNumber, vbYesNo, "Continue?") = vbNo Then Exit Sub
End If
Loop
End Sub
Dim iNumber As Long
Dim isOdd As Boolean
iNumber = 0
Do While True
iNumber = iNumber + 1
isOdd = True
If (iNumber Mod 2 = 0) Then isOdd = False
If isOdd Then
If MsgBox(iNumber, vbYesNo, "Continue?") = vbNo Then Exit Sub
End If
Loop
End Sub
Result step 3
Private Sub cmdStep3_Click()
Dim iNumber As Long
Dim isOdd As Boolean
Dim primeNumber(9999999) As Long
Dim nPrime As Long
iNumber = 0
nPrime = 0
Do While True
iNumber = iNumber + 1
isOdd = True
If (iNumber Mod 2 = 0) Then isOdd = False
If isOdd Then
nPrime = nPrime + 1
primeNumber(nPrime) = iNumber
If MsgBox(iNumber, vbYesNo, "Continue?") = vbNo Then Exit Sub
End If
Loop
End Sub
Result step 4
Including a more elaborated user message.
Private Sub cmdStep4_Click()
Dim iNumber As Long
Dim isPrimeNumber As Boolean
Dim primeNumber(9999999) As Long
Dim nPrime As Long
Dim iPrime As Long
iNumber = 0
nPrime = 0
Do While True
iNumber = iNumber + 1
isPrimeNumber = True
For iPrime = 2 To nPrime
If iNumber Mod primeNumber(iPrime) = 0 Then
isPrimeNumber = False
Exit For
End If
Next
If isPrimeNumber Then
nPrime = nPrime + 1
primeNumber(nPrime) = iNumber
If MsgBox("Primenumber" & Str(nPrime) & " = " & Str(primeNumber(nPrime)) & vbCrLf & "Continue?", vbYesNo, "Continue?") = vbNo Then Exit Sub
End If
Loop
End Sub