Where to locate warehouses? Which warehouses to open/close? The live demo below shows how Centers of Gravity Calculator helps to design a supply chain network.
1
It calculates Center of Gravity locations - indicative warehouse locations that minimize transportation costs
For a greenfield Center of Gravity analysis you only need to enter customer locations and demand.
For a more advanced analysis you can add predefined warehouses, constrain their capacity and move range, constrain customer assignment to a specific warehouse or subset of warehouses, group customers for single‑sourcing, add suppliers with auto-generated flows, run sensitivity analyses, ...
2
It can also select from a set of warehouses those that minimize transportation costs plus semi-fixed and variable warehousing costs
Making open/close decisions, given the amount of warehouses to be selected (per sub group), given the warehouses that also must be included in the solution, and other constraints.
A top-X of solutions with cost indices is included in the reports.
Used worldwide since 2014
"We have been using Centers of Gravity Calculator for years. It is better fit for purpose than the other tools we use(d) for this and we like the way Stelling Consulting is constantly improving the tool to make it even better."
Note: via section Collaborate you can export map settings into file and (re)import map settings.
i
i
i
i
i
i
i
i
i
i
Fit
Dist
Open section Calculate Center of Gravity locations. Change the number of Centers of Gravity. Press Calculate. See outcomes: map, reports, and service level distances.
Rerun with sensitivity analysis activated. How stable is the solution?
Set number of Centers of Gravity to 3, and deactivate sensitivity analysis. Activate constraint "predefined warehouses". Press Calculate. Two predefined warehouses* become part of the solution, one fixed at Birmingham (UK), one at Madrid (Spain) that may move within a range of 200 km and ends up in Guadalajara. Activate constraint "suppliers". Press Calculate. Suppliers pull Center of Gravity locations towards them: Guadalajara becomes Soria. Constraints and links to input tables are explained in user manual section Constraints. Check out the other constraints.
* In fact, the demo contains 22 more predefined warehouses. As these can move freely around, they are not really predefined from a Centers of Gravity perspective, and could have been left out for the demo so far. But, they are used in the next part of the demo.
Deactivate constraints. Open section Select best warehouses. Press button Read input data, and button Select best warehouses. It selects the best 3 out of 24 predefined warehouses. The solution resembles 3 Centers of Gravity. But transport costs are higher, 468867 versus 464757 (goal value CoG calculation). This makes sense, because those predefined warehouses are not ideally located, and the selection routine does not relocate. Repeat for another number of warehouses.
The selection changes if fixed/variable warehousing costs become relevant. (Set equal for all warehouses, so far, the selection still resembled Center of Gravity locations that are based on transport costs only.) Increase fixed costs of Madrid to at least 106140. It will no longer get selected. In general, differentiated warehousing costs may make the map look less logical/intuitive.
To learn more, read the user manual, starting with section Logical steps.
This section describes how to use the software and explains all user input.
Info is also provided via symbol
i
throughout the app. Hover your mouse over it for help info.
An overview of all sections of this app is found in the table of contents (clickable). To run a basic Center of Gravity analysis, you only need to enter customers. Read section User input - Customers to get started.
If where to open (a) new warehouse(s)? is the main question, then use Calculate Center of Gravity locations.
Step 1 is running a greenfield Center of Gravity analysis. You only need to enter demand.
Step 2 is replicating the current situation, to get figures to compare scenario's against, such as average customer distance. You enter current warehouses and fix customer assignments.
Step 3 is creating a realistic scenario that sits somewhere between the current situation and greenfield. Constraints of step 2 are partly relaxed, like "only some of the current warehouses remain as-is, but others may move to a Center of Gravity".
Step 4 (optional) is adding suppliers to include supplier transport costs in the optimization.
Step 5 is selecting a proper warehouse location for each Center of Gravity, once calculated.
1. Greenfield analysis
100% optimization freedom
Free amount of new warehouses at Center of Gravity locations
All customers reassignable
No warehouse capacity limits
3. Realistic scenario
Some optimization freedom
Some warehouses as is
Some warehouses closed
Some warehouses extended
Some warehouses added
Some customers reassignable
Some warehouse capacity limits applicable
2. Current situation
Zero optimization freedom
All warehouses as is
All customer assignments as is (so warehouse capacity limits are respected without defining those explicitly)
100% ←------ Optimization freedom ------→ 0%
Before setting up your own model, it may be helpful to play around with the demo data first, to get an idea of how the software works, and to check out - for instance - what data relates to what constraint.
A first run
Fill out table Customers in section Input tables - Customers.
You can start with only the 4 obligatory fields filled: Customer_ID, Latitude, Longitude, Demand. All fields are explained in user manual section Customers.
Select the number of Center of Gravity locations in section Calculate Center of Gravity locations
Press Calculate to run the greenfield Center of Gravity analysis. That's it! Main output - including Center of Gravity locations - is found in report section Output - Reports.
Always validate your input data! For example, does the map show extremely large customers, or large unknown customers, or gaps where you expected to see customers? Invalid input = invalid output!
Assess service levels
See service level distance metrics in report section Output - Service level distances showing percentage of demand and customers reached within a certain distance (estimated road distance between warehouse and customer). This indicates if more warehouses should be opened, or if some could be closed.
Activate "distance based customer coloring" in section Map settings below map. Customers beyond acceptable lead time distance (set in section Parameters & Constraints - Service level) become black. Based on this map you may decide to add/relocate warehouses. Or accept that some customers will have a longer lead time - which is probably already the case in reality. A few far-away customers should not be driving your supply chain network design!
Activate "Improve service level" in section Parameters & Constraints - Service level and rerun. Service level will be improved at the expense of increased transport costs.
Run sensitivity analyses
Go to section Parameters & constraints - Sensitivity analysis.
Activate "Display cost-increase-areas" and rerun. The map will show green areas around each Center of Gravity consisting of 10 bands, each band representing a 1% costs increase range. It also draws a dotted line, representing your selected % (X). If a Center of Gravity would be located somewhere at the dotted line, its inbound and outbound transport costs would increase X%. If a current warehouse falls well within acceptable-costs-increase-range, you may decide to stick with the current warehouse (enter it as a predefined warehouse), instead of opening a new one at the Center of Gravity location.
Activate "Randomize each demand quantity" and rerun. Each customer demand temporarily changes between −X% and +X%. Check how much it affects Center of Gravity locations.
Enter current warehouses
To enter current warehouses:
Fill input table Predefined warehouses with current warehouses.
Set field Move_limit to 0, to fix the warehouse location.
Activate constraint "Predefined warehouses" in section Parameters & constraints - Constraints to include predefined warehouses, and rerun.
Fix customer-warehouse assignments
To assign customers to their current warehouse:
Enter field Warehouse_ID in table Customers
Activate constraint "Fixed customer warehouse assignments" in section Parameters & constraints - Constraints, and rerun.
Displaying current warehouse-customer links may already reveil some room for improvement.
Fixing current customer-warehouse assignments automatically means that current capacity limits will be respected, so there is no need to enter field Capacity in Predefined warehouses table, yet.
Gradually relax some constraints
Investigate if current locations are optimal - given fixed customer assignments:
Increase value of field Move_limit of (some) predefined warehouses, and rerun.
Investigate if current customer assignments are optimal - given fixed warehouse locations:
Empty field Warehouse_ID of (some) customers, and rerun
Or deactivate constraint "Fixed customer-warehouse assignments" in section Parameters & constraints - Constraints, and rerun.
Investigate where to open a next new warehouse:
Increase the number of Center of Gravity locations beyond the number of predefined warehouses, and rerun.
Make sure you allow (some) customers to get (re)assigned to this new warehouse.
Activate other types of constraints
Limit warehouse capacities:
Enter field Capacity in the Predefined warehouses table.
Activate constraint "Capacity limits" in section Parameters & constraints - Constraints, and rerun.
Keep in mind that current limits may not apply in future, if additional space can be rented or the owned facility expanded!
Group customers for single sourcing:
To enforce all customers within a group to be assigned to the same, single warehouse:
Enter field Group in table Customers.
Activate constraint "Customer groups" in section Parameters & constraints - Constraints, and rerun.
Intro
A Center of Gravity analysis focuses on the demand side with its relatively high transport costs and lead time requirements.
But you can add suppliers to include supply transport costs.
Adding suppliers becomes more relevant in a Center of Gravity analysis if there are a few dominant supply locations (such as a large plant or entry harbour), in which case a warehouse should move towards that location. Note that a supplier may pull all warehouses, whereas a customer only pulls one.
Enter suppliers
Enter suppliers - at least obligatory fields Supplier_ID, Latitude, Longitude, Supply - in input table Suppliers.
Enter supplier transport rate
Supplier shipments are usually larger than customer shipments, on average. This makes supplier transport relatively cheaper. The lower transport rate makes suppliers pull Center of Gravity relatively less than customers do. Enter supplier transport rate in section Parameters & Constraints - Transport rates.
Activate suppliers
Activate constraint "Suppliers" in section Parameter & constraints - Constraints.
Select supply option
Select 1 out of 4 supply options in section Parameter & constraints - Supply options. It determines how supply flows are constructed.
Non-unique products
Option 1: Each supplier delivers to closest warehouse only
Used for a scenario in which local suppliers supply non-unique products to local warehouses.
Closest warehouse (auto-detected) can be overruled by specifying a predefined warehouse in the supplier table.
This option will neither create inter-warehouse flows nor rescale supply, in order to balance supply with demand, as it gives the user full control over supplier-warehouse flows.
Option 2: LP optimized supply flows - with auto-sized suppliers
Used for a scenario in which suppliers supply non-unique products to warehouses.
This Linear Programming procedure creates supplier-warehouse flows that minimize supplier-warehouse transport costs, while adhering to available supply quantities (and fixed supplier-warehouse assignments**).
You may give suppliers "infinite" supply, as this LP procedure makes supply match demand exactly. It auto-sizes suppliers. ** If fixed supplier-warehouse assignments make it impossible for supply to reach demand, then these assignments are (partly) ignored. A supplier will then also supply warehouses other than the one you assigned it to. This causes a cost penalty. The LP procedure avoids penalties, as long as possible. If a penalty was unavoidable, then you will get a message. Penalties are excluded from costs outcomes as reported.
Unique products
Option 3: Each supplier delivers to each warehouse (default option)
Used for a scenario in which suppliers supply their unique products to each warehouse directly. The supplier volume to each warehouse is pro rata the customer demand assigned to each warehouse.
Option 4: Each supplier delivers to each warehouse via closest warehouse
Used for a scenario in which suppliers supply their unique products to each warehouse - via the closest warehouse (2-echelon) - pro rata demand assigned.
Closest warehouse (auto-detected) can be overruled by specifying a predefined warehouse in the supplier table.
Remarks
You can specify the supply option at individual supplier level. It will overrule the generic setting. This way you can create a mix of options 1/3/4. Option 2 cannot be combined with other options.
If you have specified a fixed warehouse at a supplier (= supply single warehouse) but also selected option 3 (= supply all warehouses), this causes a logical inconsistency. In that case option 3 is converted into option 4 'in background'.
Under options 2/3/4 each supplier - unlike a customer - pulls several/all warehouses.
Demand side only
Only customers pull warehouses.
Supply option 3
Customers pull warehouses. Also, each supplier pulls all warehouses.
Supply option 4
Customers pull warehouses. Also, each supplier pulls all warehouses, and especially the closest one.
Revisit step 2 and 3
Of course, to keep comparisons apples-to-apples, you need to revisit steps 2 and/or 3 and rerun with suppliers activated in those steps as well.
Once the Center of Gravity locations have been calculated (based on road distance estimations), select a proper warehouse location for each Center of Gravity (that may have ended up on top of a mountain or in the middle of a lake).
In section Map settings, select ESRI map and decrease Center of Gravity size factor or opacity to see the road network.
Consider locations within the 1%-costs-increase-range around the Center of Gravity - the visual outcome of the sensitivity analysis as described under step 1.
If the Center of Gravity sits on top of a dominant customer or supplier, then search for a highway/expressway junction close by. In this case, the 1%-costs-increase-range will be relatively small. Else, search for a location where two expressways cross each other. At such crossing, transport in any direction will not cause a detour. Whereas if a location is only near an east-west expressway, then transport to the north or south means a detour to reach the north-south expressway. Moving the location to the crossing will remove that detour for 3 directions, but add it to 1 direction (east). If demand is almost equally divided across all 4 directions - which is usually true for a Center of Gravity - then this move lowers the sum of weighted road distances.
You may want to double check your selected location by testing also locations around it using actual road distances (instead of estimations). These can be retrieved with Batch Driving Distances Caclulator. Note that Google Maps returns the road distance of the fastest route, not shortest. Which is fine. But fastest route may depend on time of the day, day of the week, time of the year, roadworks, or vary between routes that are nearly-equivalent. So, even actual road distance might still be an estimation, to some extent.
Even better would be to score locations using transport tariffs. But - most likely - you will not have all tariffs. You can obtain those by organizing an RFQ/RFP process - asking logistics service providers to quote for the transport operation (and warehousing operation, covering other/qualitative factors as well). Of course, there may be no warehouse space for rent/sale at your intended location.
If which warehouse(s) to open and which to close? is the main question, then use Select best warehouses.
Mandatory steps
Enter your data in the input tables. Predefined warehouses is no longer optional input, but mandatory.
in section Select best warehouses: Press button "Read input data". Specify the number of warehouse to be selected (per group) and make your solver selection from 3×3 matrix. Press button "Select best warehouses".
Optional steps
Enter warehouse capacity limits. Keep in mind that current limits may not apply in future, if additional space can be rented or the owned facility expanded!
Enter fixed customer-warehouse assignments, if some customers definitely need to be delivered from a specific warehouse.
You may override the transport costs input as calculated by the software with your own transport costs based on your own costing method / on actual rate tables / on actual road distances that can be retrieved using Batch Driving Distances Calculator (Google Maps based).
Transport rates for new warehouses may be unknown. Or transport rates from a current warehouse to customers that are currently delivered from another warehouse may be unknown. Unknown rates is often a cumbersome part in supply chain network design, and reason to use a simpler costing method that is - more or less - similar to the one embedded in this software.
Enter warehouse fixed/variable costs, so these can be taken into account as well in the optimization.
How to activate constraints
Constraint
Supported
How to activate
Predefined warehouses
yes
Always active (regardles constraint setting).
Fixed customer-warehouse links
yes
By activating constraint in section Parameters & constraints - Constraints
Capacity limits
yes
By using Greedy solver or LP solver (not by activating constraint).
Customer groups
no
Suppliers
yes
By activating constraint in section Parameters & constraints - Constraints. Supply option 3 is activated in background. Other options not supported.
Border crossing points
yes
By activating constraint in section Parameters & constraints - Constraints.
Mandatory fields
Customer_ID is a free format identifier.
Latitude and Longitude are both decimal numbers and the result of converting a textual ship-to address (not sold-to adress) into geographic coordinates - a process called geocoding. You can use:
Double check postal codes on missing leading zeroes. If - for example - you notice German or French postal codes with only 4 digits instead of 5, then a leading zero might be missing. This issue is quickly caused in/by Excel if you have not set your postal code column to type "text". Incorrect postal codes may cause geocoding problems. And if you would aggregate customer demand at 2-digit postal code level (often seen in European supply chain models), you will end up with demand at the wrong location!
Put aggregated demand of far-away-customers delivered by sea/air (on overseas island) on exit harbour/airport (latitude/longitude), to ensure that Center of Gravity locations are pulled in the right direction, and to avoid that one of the Center of Gravity locations ends up in such remote customer area. Or simply remove them, if their demand is marginal.
Try to keep your model small. If you have more than 5,000 customers, then - most likely - this amount can be (greatly) reduced by aggregation, while keeping the model valid. It makes your model run (much) faster. Of course, you can always run it first without aggregating data. See Aggregation suggestions at the end of this section.
Demand = total yearly future demand of a customer (as your are designing for the future), ideally expressed in your transport cost driver: volume or (volumetric) weight.
Collect a full year of demand data if your business is highly seasonal. Otherwise, one month × 12 may do.
Design for the future: include demand growth percentages.
If available, then use shipment data with volumes or weights. Otherwise, demand can be calculated based on sales order quantities × item dimensions. But beware: item masters are often not 100% clean, which may cause large calculation errors. Check at least for shipments that exceed truck capacity or are extremely small.
If a sales budget is the only info (new market entry), then use demographics to create a geographical demand proxy.
Though not obligatory, it is advised to enter demand figures as whole numbers, as these are easier to read.
Optional fields
Warehouse_IDs is used to assign a customer to a predefined warehouse, so it should match to a Warehouse_ID as defined in table Predefined warehouses. If left empty, then no fixed assignment applies.
Create a fixed assignment by entering a single warehouse_ID.
Create a semi-fixed assignment by entering a subset of warehouses_IDs that the solver is allowed to select from.
Use / as separator between warehouse_IDs. For example, Birmingham/Madrid/WH05.
Group - free format - is used to force all customers within the same group to be delivered by the same single warehouse only (single-sourcing). What group stands for, is for you to decide. For example, a country. The group is assigned to the warehouse that comes with the lowest sum of weighted distances for this group of customers. Underlying cost calculation is still done at individual customer level. Read user manual section Center of Gravity algorithms - Customer grouping for more info. A fixed customer-warehouse assignment takes precedence over a customer group. Warehouse capacity limits may cause a customer group to 'break'.
Activate constraint "Customer groups"
in section Parameters & constraints - Constraints.
Shipment_size translates into an individual customer transport rate. If specified, then it overrules the general customer shipment size. Read user manual section Transport rates for more info. Make sure it does not exceed truck capacity. Shipment size can be expressed in KG, M3, pallets, loading metres, ... which - of course - should relate to how you have expressed demand.
Lead_time_distance is the individual maximum allowed distance from the warehouse. If specified, then it overrules the general lead time distance as set in section Parameters & constraints - Service level. Customers are colored in black if the leadtime distance is exceeded, indicating where service is compromised. Enter the distance in the correct distance unit, miles or kilometers, as you have selected in section Parameters & constraints - Distance.
Border_group links the customer to a border group. A border group has specific border crossing points to enter or exit the bordered area. Those border crossing points are defined in table Border Crossing Points. A flow from a warehouse to a customer will go via one of the border crossing points, unless the warehouse and customer are both inside the bordered area.
Activate constraint "Border crossing points"
in section Parameters & constraints - Constraints.
Optional fields for "Select best warehouses" functionality only
Qty_1 to 5 are the warehouse cost driver quantities of a customer, such as #orders, #order lines, #unit_picks, #carton_picks, #pallet_picks. You may decide yourself what each qty stands for.
Various remarks
After having entered 4 obligatory fields you can run a first Center of Gravity analysis. Go to Calculate Center of Gravity locations and press Calculate.
Always validate your data! Check top-X customers list. Are major customers missing? Or do unknown customers appear? Check the demand map. Are gaps seen? Or do large unknown locations appear?
Default customer opacity is 0.9 to make customers behind each other visible. Small customers are plotted on top of large. But still. Customers with the same latitude/longitude are plotted on top of each other. Only a relatively small dot will be seen that does not reflect total demand. By aggregating demand, you might get a more insightful demand map.
Try to keep your model small. If you have more than 5,000 customers, then - most likely - this amount can be (greatly) reduced by aggregation, while keeping the model valid, as can be seen in the examples of below section Aggregation suggestions. It makes your model run (much) faster. Of course, you may always run it first without aggregating data. Valid reasons for wanting to keep data at granular level: individual customer shipment sizes and/or tight warehouse capacity limits (easier to match those limits more closely having many small customers that can be (re)assigned than having only a few big aggregated customers - as customers cannot be partially (re)assigned to a warehouse).
You may simply round each customer latitude and longitude to two decimals, then aggregate demand per rounded latitude, rounded longitude. By rounding a customer may shift 0.78 km (0.5 mile) from its original position, at most. This 0.78 km is the as-the-crow-flies distance between (latitude, longitude) point (0.000, 0.000) and (0.005, 0.005). The further away from the Equator, the smaller this maximum shift becomes. At a 'European' latitude of 44.000 it is 0.68 km. On average, customers shift approx. 0.37 km, which is unnoticeable on the map. Moreover, all customer shifts together will counterbalance each other to a large extent, so Center of Gravity locations shift a negligable 0.0-0.1 km.
This aggregation becomes more precise if using weighted average latitude and longitude within each aggregation category as customer coordinate (instead of rounded coordinates as such). It also means that if there is only one customer in a category (or several at exactly the same location), then it does not shift at all!
Button Aggregate aggregates customers (ignoring optional customer fields) as follows:
Step 1: round latitude and longitude of each customer to 0.01 (or 0.025, 0.05, ...) and concatenate those as aggregation category, for example "lat_41.15_lon_20.17".
Step 2: For each aggregation category calculate the weighted average latitude and longitude of customers within that category as new customer coordinates (instead of simply using 41.15, 20.17 as new location), and sum demand of customers within the category as new demand.
Instead of rounding to 0.01, you can choose to round to 0.025, 0.05, 0.1, 0.25, 0.5, or 1.0. Of course, the higher this number, the less accurate the aggregation becomes.
Or you may aggregate demand per 2-digit postal code, per country if creating a supply chain model for total Europe. Each country becomes 100 customers, at most. For example, customer DE-13 stands for all German customers with postal code 13XXX (ISO Alpha-2 country code for Germany is DE). On a side note: transport rate tables often use aggregated postal code zones, so are only accurate to that level as well.
Add 2-digit postal code to each customer. Create a pivot table to sum demand per 2-digit postal code. Use geocodes of largest customer with that 2-digit postal code to locate aggregated demand (no need to geocode all customers). Or use geocodes from
If your case is about a single country, then aggregating at 3-digit postal code level may be more appropriate. This will result in a model with 1000 customers, at most.
The appropriate level of aggregation depends on geographical scale and average warehouse-customer distances. The larger the scale, the longer the distance, the larger the aggregation range may become. And vice versa.
Example 1: US case, aggregate all customers, rounding lats/lons to 0.1, or to 1
Rounding to 0.1: 3252 customers become 2239 aggregated customers (31% reduction).
With 1 Center of Gravity: location shifts 0.0 mi.
With 5 Centers of Gravity: largest shift 0.3 mi.
Rounding to 1: 3252 customers become 469 aggregated customers (86% reduction).
With 1 Center of Gravity: location shifts 0.2 mi.
With 5 Centers of Gravity: largest shift 18.4 mi, Gainsville becomes Oakleaf Plantation (FL), second largest 9.7 mi, which is marginal.
Example 2: EU demo case. Aggregating customers in The Netherlands
The demo case is at European scale. The Netherlands is a small European country. Aggregating 29 customers in The Netherlands (field Group = NL) into 1 customer (with a total demand of 136890 and located at 51.9795, 5.3627) has almost zero effect on outcomes.
With 1 Center of Gravity: location shifts 0.3 km.
With 3 Centers of Gravity: location differences are only noticeable if animated. Location Asse (BE) that supplies NL customers shifts 2.3 km. Azuqueca de Henares (ES) 'steals' 1 customer from Asse, shifts 7.6 km and becomes Guadalajara (ES). Szekszárd (HU) does not shift.
NL aggregated - 3 Centers of Gravity - animation
Original demo - 3 Centers of Gravity
Goal value: 464757
Example 3: EU demo case. Aggregating all customers, rounding lats/lons to 1
588 customers become 317 aggregated customers (46% reduction).
With 1 Center of Gravity: location shifts 0.5 km which is unnoticeable on the map.
With 3 Centers of Gravity: location differences are still hardly noticeable unless animated. Asse (BE) shifts 11.9 km and becomes Lebbeke (BE). Azuqueca de Henares (ES) shifts 2.0 km. Szekszárd (HU) shifts 41 km westward and becomes Dombóvár (HU). It turns out that using those 3 new locations as predefined warehouses in the original case with 588 customers increases the goal value 0.02% only. So, this solution is an alternative equivalent for the original case solution.
All aggregated - 3 Centers of Gravity - animation
All aggregated - 3 Centers of Gravity
Both solutions are equivalent
Goal value
Index
Original case with 588 customers
464,757
100.00%
3 aggregated-case-warehouses forced upon original case
464,835
100.02%
Aggregated case with 317 customers
463,980
100.00%
3 original-case-warehouses forced upon aggregated case
464,084
100.02%
Sensitivity analysis shows that Dombóvár (red dot) is located well within the 0.05%‑costs‑increase‑range around Szekszárd.
Of course, with 588 customers only, there is no need to aggregate data at all. But even at such low number of customers, and using a rather crude level of aggregation, aggregation is possible while outcomes remain valid, even if aggregation is done rather roughly by rounding to 1. (Besides, the whole exercise can also be seen as an additional sensitivity analysis, as future customers may also be located slightly elsewhere than current customers.) If you have more than 5,000 customers, then - most likely - this amount can also be (greatly) reduced by aggregation, while keeping the model valid.
Mandatory fields
Activate constraint "Predefined warehouses"
in section Parameters & constraints - Constraints to include predefined warehouses in the solution.
Warehouse_ID - free format, for example "Birmingham" - is used in the Customers and Suppliers table to assign customers or suppliers to this warehouse (instead of having the software assign customers and suppliers).
Latitude, Longitude is the result of converting a textual address into geographic coordinates - a process called geocoding. For more info, read the help text for fields Latitude, Longitude of Customers.
Optional fields
Move_limit = 0 (default) means a fixed location, > 0 means a location that may move away from its initial coordinates but no further than its move limit. To be expressed in either miles or kilometers, as you have selected in section Parameters & constraints - Distance.
Capacity is used to limit warehouse throughput, with throughput being demand assigned to this warehouse plus - if applicable - inter-warehouse quantities coming from the warehouse. It is not storage capacity. Warehouse capacity limits may cause customer groups to 'break'.
Activate constraint "Capacity limits"
in section Parameters & constraints - Constraints.
Transport_rate_index is used to adjust customer transport rates of all customers supplied from this warehouse. An index below 100 means transport from this warehouse to customers is relatively cheaper, an index larger than 100 means more expensive. Customer transport rates are multiplied by the warehouse Transport rate index/100, for all customers assigned to the warehouse. The lower this index, the more customers a warehouse will get assigned (unless other constraints prevent this).
IsSatellite = 0 (no) or 1 (yes) and is used to distinguish main warehouses from satellite warehouses. This is relevant if suppliers are activated and parameter "Link supplier to closest Main warehouse" is checked. Even in a demand-only model main→satellite warehouse flows are generated.
MainWarehouse_ID is used to assign a satellite warehouse to a main warehouse. If left empty, then the satellite warehouse gets linked to its closest main warehouse.
Color overwrites the default warehouse color. Format: #rrggbb (red,green,blue hexidecimal values)
Pick color → Color =
Optional fields for "Select best warehouses" functionality only
Whs_group (opt)
Valid entries are 'a', 'b', 'c', 'd', 'e', 'f', 'g', 'h', 'i', or 'j'. If left empty, default 'a' is used.
Group 'j' is a special 'must-be-included' group. All warehouses in group 'j' will always be included in the selection (which of course may affect the selection of warehouses from other groups).
Group can be interpreted as geographical region. By grouping warehouses per region you can ensure that each region gets a warehouse, if you set the number to be selected from that group higher than 0.
Fixed_costs are in fact binary-fixed costs, the fixed costs apply if a warehouse is selected.
Rate_1 to 5 are the warehousing cost per unit for up to 5 cost drivers (and linked to your customer table). Example: if customer X has Qty_1 = 10 and Qty_2 = 5, and warehouse Y has Rate_1 = 2.50, and Rate_2 = 3.75, then the variable costs of this customer X at warehouse Y are 10×2.50 + 5×3.75.
Mandatory fields
Activate constraint "Suppliers"
in section Parameters & constraints - Constraints to include suppliers.
Supplier_ID: free format identifier.
Latitude, Longitude is the result of converting a textual address into geographic coordinates - a process called geocoding. For more info, read the help text for fields Latitude, Longitude of Customers.
Supply is the total yearly future supply of a supplier. Usually, the supply of all suppliers should - more or less - match the demand of all customers. Unless supply is about the dry ingredients of liquid finished products, for example.
Optional fields
Warehouse_IDs (= link to table Predefined warehouses) is used to assign a supplier to a warehouse or subset of warehouses (similar to assigning a customer to a warehouse or subset of warehouses). If left empty, the software decides which Center of Gravity location(s) is/are supplied by the supplier. If specified, then this supplier will not supply all warehouses directly, even if supply option "Each supplier delivers to each warehouse directly" has been selected.
in section Parameters & constraints - Constraints.
Shipment_size translates into an individual supplier transport rate.
Supply_option (1, 3, or 4) can be set to overrule the general supply option (1, 3, or 4) as selected in section Parameters & constraints - Supply options. General supply option 2 (LP optimized supply flows) can not be overruled at individual supplier level (individual settings are ignored).
For more info about suppliers, transport rates, and supply options, read user manual section Logical steps - Step 4. Add suppliers
Mandatory fields
Activate constraint "Border crossing points"
in section Parameters & constraints - Constraints.
The use of border crossing points may improve distance accuracy and direction in which a Center of Gravity is pulled.
If an area can only be entered/exited at some specific points, you may enter these border crossing points.
A transport flow has to go via a border crossing point if
a warehouse is outside the bordered area and the customer inside ("entry")
a warehouse is inside the bordered area and the customer outside ("exit")
A flow via a border crossing point means a detour. The border crossing point causing the smallest detour is auto-detected. It also means that the warehouse is pulled towards this point instead of the customer, until the border has been crossed.
Border_group - free format - is the name of the bordered area with all its crossing points (latitude, longitude) entered in this table. Field border_group is also found in the customers table and used to specify which customers belong to the border group (thus defining its geographic shape). To function properly at least some customers of a bordered area should be located close to the border point (within a 50 km range).
In the picture on the right the border crossing points in the northern part of Italy prevent shortcuts across the Adriatic Sea. If ferries are a valid transport option, then you may remove all border crossing points or add ferry harbours as points.
Current implementation handles only one border crossing point per flow, not multiple. A warehouse area exit point takes priority over a customer area entry point: "exit before entry".
Intro
By (de)activating constraints (optional) in section Parameters & constraints - Constraints you (de)activate parts of your input data, so you can quickly investigate how a constraint affects goal value and supply chain network structure.
The following explains the links between constraints and input tables. Similar info is provided in previous sections. But this section is more focused. It also describes demo data, so you can check how a constraint is set up.
Predefined warehouses table
Ad 1. Activate constraint "Predefined warehouses" to include predefined warehouses in the solution. Demo: contains one predefined warehouse in Birmingham (UK) and one in Madrid (Spain), with field Move_limit set to 0 for the Birmingham warehouse (it cannot move), and set to 200 for the Madrid warehouse (it can move within a 200 km range). If the number of Centers of Gravity is set higher than two, then these two locations will be part of the solution (Birmingham remains Birmingham, Madrid is moved to Guadalajara if running for 3 Centers of Gravity). If you make Madrid's Move_limit 0, it will remain Madrid.
Note In fact, the demo contains 22 more warehouses. As these can all move freely around (9999 km), they can not really be considered predefined for the Centers of Gravity calculation, and they might just as well have been left out. They have been added to demonstrate the "Select best warehouses" functionality (that selects only, and does not relocate warehouses).
Ad 4. Activate constraint "Capacity limits" to limit total customer demand that can be assigned to the warehouse. Demo: field Capacity is set for both predefined warehouses Birmingham and Madrid.
Ad 5. For more info about capacity limits and LP optimization, read user manual section Center of Gravity algorithms - Warehouse capacity limits.
Customers table
Ad 2. Activate constraint "Fixed customer-warehouse assignments" to assign customers to a predefined warehouse (or subset of predefined warehouses). Demo: field Warehouse_IDs is set to "Birmingham" for all customers in UK/Ireland to assign them to the predefined Birmingham warehouse. It is set to "Madrid" for all customers in Spain/Portugal.
Ad 6. Activate constraint "Customer groups" to have all customers within the same group delivered by the same single warehouse that can deliver the group against lowest transport costs. These costs are still calculated at individual customer level, see example in user manual section Center of Gravity algorithms - Customer grouping. Demo: field Group is filled with the applicable 2-letter ISO country code for all customers. So - in the demo - group stands for country. This prevents customers in Western France to get delivered by the UK warehouse.
Ad 8. Activate constraint "Border crossing points" to include border crossing points. Demo: field Border_group is filled for customers in UK, IE, Italy, and Iberia.
Suppliers table
Ad 7. Activate "Suppliers" to include suppliers. Also select a supply option. Demo: contains one supplier in Rotterdam (The Netherlands - Entry harbour supplying 71% total demand), and one in Bologna (Italy).
Ad 3. Activate constraint "Fixed customer-warehouse assignments" to assign suppliers to a predefined warehouse. It links to field Warehouse_ID. If filled, then the supplier will only supply this warehouse. And via this warehouse to each other warehouse, if supply option "Each supplier delivers to each warehouse via closest warehouse" is selected. Note that if field Warehouse_ID is filled, then a supplier will never supply all warehouses directly, even if supply option "Each supplier delivers to each warehouse directly" has been selected.
Border crossing points table
Ad 8. Activate constraint "Border crossing points". Demo: field Border_group relates to the same field found in the customer table and specifies which border crossing points (if any) are applicable for which customers. The demo contains a limited amount of border crossing points in Italy, Iberia, UK/Ireland, just to show you how this concept works.
Intro
In section Parameters & Constraints - Transport rates you set transport rates to differentiate between customer and supplier transport. You may also adjust the cost curve that expresses how much - relatively - more expensive smaller shipments (LTL-like transport) are compared to larger shipments (FTL-like transport).
Transport costs curve
Smaller shipments being relatively more expensive than larger shipments is expressed in the transport cost curve.
The default cost curve shows that a shipment size of 50% FTL brings 72.4% FTL costs, meaning that - per each unit transported - it is 1.45 times more expensive than FTL transport.
You can adjust the curve by dragging control point handles or entering control point values in the cost curve settings below the chart.
Small customer shipments versus large supplier shipments
Smaller shipments to customers are relatively more expensive than larger shipments from suppliers. Average customer and supplier shipment sizes - as set in the transport rates table - are translated into rates by applying the cost curve.
Shipment size can be expressed in KG, M3, pallets, loading metres, ... It should relate to how you have expressed customer demand, as a single transport unit of measurement applies to the whole model.
The ratio supplier/customer rate is important as it expresses how relatively less suppliers pull warehouses than customers do.
This ratio is independent of cost/km. Therefore, high accuracy of cost/km is of lesser importance.
Ratio supplier rate/customer rate
The ratio supplier rate/customer rate expresses how relatively less suppliers pull warehouses than customers do.
To minimize transport costs a Center of Gravity should move closer towards a customer than towards a supplier, if their total transport volumes would be equal, regardless distance!
Above chart can be verified by geometry that brings the following formula for the Center of Gravity x‑position = max(0, 100 + 50 × F / √(1 - F2)), with F = (1 - 3 × ratio)/2. F stands for pull force in horizontal direction - of both customer C1 and C3 - required to reach an equilibrium state.
It is easy to understand that x‑position becomes exactly 100 at ratio 1/3, as supply quantity of 3 × 1/3 balances with C2 quantity of 1, and C1 and C3 then pull it to 100.
For a ratio ≥0.93 the supplier pull force outweighs customer pull forces, so the Center of Gravity ends up on top of the supplier. This 0.93 is in fact (1+2×1/√(12+0.52))/3 =
(1+4/√5)/3 = 0.9296...
Keep in mind that a supplier is not just a small customer as they can pull all warehouses. Read user manual section Logical steps - Step 4. Add suppliers for more info.
Small customer shipments versus large customer shipments
Similarly, shipments to small customers are relatively more expensive than shipments to large customers. To differentiate you can enter individual shipment sizes at individual customer (and also at individual supplier level). The impact of individual shipment size on Center of Gravity locations may be small, if smaller and larger customers are scattered all around.
Auto-sizing shipments per individual customer
Calculates individual shipment sizes, replacing the average customer shipment size as set in transport costs table, assuming shipments to larger customers are larger and shipments to smaller customers are smaller.
The chart shows the assumed relation between demand volume and shipment size.
As this method is rough, it is better to enter actual individual shipment sizes in the customer table than to activate auto-sizing.
Displaying transport-rated volumes on the map
In section Map settings you can choose to display location sizes as transport-rated volumes (volume × rate ratio), instead of plain volumes (default setting). Suppliers will then appear relatively smaller than customers, which better reflects the Center of Gravity 'pull forces' of suppliers and customers.
A default model looks like: (suppliers →) warehouses → customers
But you can also model: (suppliers →) warehouses → warehouses → customers
There are two options to model inter-warehouse flows.
In a model with suppliers: Select supply option "Each supplier delivers to each warehouse via closest warehouse".
Closest warehouse can be overruled by specifying a predefined warehouse in field Warehouse_IDs of the supplier table. Supply quantities (that are related to demand quantities) determine warehouse-warehouse flow quantities.
In a model without suppliers: Set up predefined warehouses, some as main warehouse (field IsSatellite=0), some as satellite (IsSatellite=1).
Each satellite gets supplied by its closest warehouse. Satellite demand quantities determine warehouse-warehouse flow quantities.
You can combine it with forcing a link between a customer/supplier and a (subset of) warehouse(s) by entering field Warehouse_IDs.
In general, try to keep your model simple. Its purpose is to help answer questions. That does not necessarily mean it should reflect reality as closely as possible. For example, if all suppliers deliver to a single plant (main warehouse), and the plant delivers to warehouses that deliver to customers, you can create a 2-echelon model with plant (main warehouse) → warehouses. But if that plant location is fixed, then there is no possibility to optimize suppliers→plant flows. So, you may consider replacing all suppliers and plant by a single fake supplier at (previously) plant location, and revert to a simple 1-echelon model.
Note: "Select best warehouses" routine does not support inter-warehouse flows.
Goal value to be minimized is the sum of weighted distances. In a basic approach distances are weighted by quantities only. Centers of Gravity Calculator uses two weights. Distances are weighted by transport quantity (1st weight) × transport rate (2nd weight). The transport rate converts distances and quantities into costs. Primary reason for adding transport rate as a second weight is to make suppliers (larger shipments, relatively less expensive FTL-like transport) pull Center of Gravity locations relatively less than customers (smaller shipments, relatively more expensive LTL-like transport) do, rather than to come up with highly accurate transport costs.
The percentual change in goal value of future scenario compared to baseline can be applied to your actual baseline costs (derived from your financial reports) to estimate the transport costs effect of the future scenario. Because transport costs partly consist of (un)loading costs that will not change, you may add some factor to dampen the costs effect.
Baseline
Future scenario
Baseline transport costs from your financials
USD 12,000,000
Goal value Centers of Gravity Calculator
10,000,000
9,000,000
Goal value change (as %)
-10%
Dampening factor (value assumed at 0.80)
0.80
Goal value change × dampening factor
-8%
Transport costs effect
- USD 960,000
Future scenario costs
USD 11,040,000
Read user manual section Transport rates for more info about transport rate differentiation between customers and suppliers.
In case of an owned truck operation, see section Parameters & Constraints - Yearly mileage estimator. It supports the estimation of transport mileage. That mileage can be used to estimate transport costs effects more precisely.
This section explains in detail how to calculate Center of Gravity locations, and includes several (interactive) animations.
A Center of Gravity is a location that minimizes transportation costs / Center of Gravity locations are indicative warehouse locations that minimize transportion costs.
Center of Gravity locations are locations that minimize the sum of weighted distances (acting as an indicator for transport costs).
In a basic model, weighted distance is the distance from warehouse to customer multiplied by customer demand.
If a customer has a demand of 10 and is located 25 kilometers from its warehouse, then its weighted distance is 250 kilometers.
In an extended model, also distances from suppliers, and from/to other warehouses are included.
You may have read elsewhere that the formula that calculates the weighted average of customer x coordinates (and same for y) brings the Center of Gravity x and y coordinate. It does not!
The weighted average formula brings an initial position, that is often good - however - not optimal yet. Often the calculated position comes with a sum of weighted distances that is only 0-5% worse compared to true Center of Gravity, sometimes more, and theoretically even 100% worse is possible. Proof is given in section "Algorithm in full detail" by means of a small "100% worse" calculation example. You can also see that it is not optimal (but often near-optimal) in section "Animated explanation (real-time simulations)".
Calculating the Center of Gravity properly requires an iterative algorithm.
Imagine a case with two customers only. Customer A has a demand of 10 and customer B of 1. Where is the Center of Gravity? Somewhere on line A-B, closer to A?
Well, you could say that customer A pulls 10 times harder than customer B. If the 'Center of Gravity'* moves a distance d towards customer A, then the sum of weighted distances decreases (10 × d) – (1 × d) = 9 × d.
* If put between quotes then it refers to a location under investigation which is not yet the true Center of Gravity.
So, the Center of Gravity is right on top of customer A, not somewhere in between customer A and customer B!
The resultant pull force - sum of all customer pull forces - is leading. It always points in the direction that the 'Center of Gravity' should move into to decrease the sum of weighted distances. This resultant pull force is constructed by linking all customer pull forces together, head to tail.
However, the sum of weighted distances will only decrease if the 'Center of Gravity' moves the right distance! The resultant pull force does not tell how far to move. Move this far?
Or this far?
If the move distance is set extremely small, you will for sure end up on top of the Center of Gravity, but it will take an extremely large amount of moves before the Center of Gravity is finally reached.
Therefore, it is better start with big moves. Which then will cause 'overshooting' (after some steps). In case of overshooting the sum of weighted distances will have increased instead of decreased, and the resultant force arrow changed - or even completely reversed - its direction. By then, the move size needs to be reduced in order to get closer to the Center of Gravity. Else, the next move would end up at the previous position, followed by getting stuck in a loop of going back-and-forth without ever getting any closer. By reducing the move size each time the sum of weighted distances increased the 'Center of Gravity' ends up on top of the Center of Gravity.
Using this approach with a variable step size, the algorithm works much faster. For example, it can search within a range of 1024 km (= 210 km) in always 10 steps to 1 km precision. Whereas it would take an algorithm with a small fixed step size of 1 km on average 500 steps to reach the Center of Gravity, and worse case 1000 steps.
Of course, the above was an extreme example. Usually, there is no single dominant customer, and the Center of Gravity will be somewhere in the center of all customers. Also then, the Center of Gravity is found by moving in the direction of the resultant pull force (using the fast step approach as described above). It becomes zero on top of the Center of Gravity, with all underlying pull forces (F) in a state of equilibrium in both x and y direction: ΣFx=0, ΣFy=0. All forces linked together start and finish at exactly the same location = Center of Gravity, with zero resultant force.**
**Except if one dominant customer outweighs all other customers. Then the Center of Gravity is on top of this dominant customer, but the resultant force is not zero. And another exceptional case, rather theoretical, is one in which there are only two customers, A and B, with equal demand. Then the resultant force is zero for all points between A and B on line A-B. Each of these points is Center of Gravity.
The weird thing is that minimizing the sum of weighted distances by calculating the Center of Gravity is not about distances as such, as it is about pull forces and directions. If in the above example with 8 customers, one customer would be located 10/100/1000 times further away from the Center of Gravity in exactly the same direction, this would not affect the Center of Gravity at all.
The Single Center of Gravity algorithm works like this on an x,y plane:
Initialization: locate the 'Center of Gravity' at an initial (random) position, and give the move distance a large value.
Calculate the resultant pull force. Move the 'Center of Gravity' in that direction, at move distance.
Calculate the sum of weighted distances. If it increased, then divide the move distance by two.
Repeat steps 2 and 3 until the move distance becomes very small.
This algorithm will always find the global optimum with a single run. With this type of problem, there is no chance of getting stuck in local optimum. The algorithm relates to the gradient descent method (wikipedia), also used by Excel Solver's method GRG Nonlineair (GRG stands for Generalized Reduced Gradient).
Determining the Center of Gravity is like finding the x and y coordinate of the lowest point (x,y,z) in a bowl-shaped 3D‑chart - visualizing the sum of weighted distances z = f(x,y) for each x and y - by going into the direction of steepest descent as pointed to by the resultant pull force. During this descent the direction gets adjusted after each move made/step taken.
There are methods to determine a proper move distance (a.k.a. step size) per iteration. But these are rather complex and (thus) time-consuming. Luckily, there is no urgent need for those, because the method of step 3 works and is fast.
Initialization: locate the 'Center of Gravity' at an initial (random) position, and give the move distance a large value.
A good initial x,y-position is the weighted average of x (and same for y) coordinates of its customers. It is often near-optimal, but not the Center of Gravity. Often it is only 0-5% worse, sometimes more (which also sometimes happens in simulation further below), and theoretically even 100% worse is possible.
Imagine a case with only two customers, customer A with demand 1000 at x,y position (0, 0) and B with demand 1 at position (100, 0). The weighted average x,y position is (0.0999, 0), with 0.0999 calculated as (1000×0 + 1×100)/(1000+1).
If the 'Center of Gravity' moves a distance d towards customer A the goal value improves 1000×d (closer to A) − 1×d (further from B) = 999×d. So the Center of Gravity is on top of customer A, not at the initial weighted average x,y position!
The Center of Gravity has a sum of weighted distances of 1000×0 (customer A) + 1×100 (customer B) = 100, whereas the initial position has a value of 1000×0.0999 (customer A) + 1×99.9 (customer B) = 199.8, which is 99.8% worse! Of course, this is a highly theoretical example.
A random location within the customer cloud can be used just as well, as the remainder of the algorithm will always find the Center of Gravity, in almost equal time.
It is better to start with a bit too large move distance (100 kilometers) than with a bit too small, because if too small then it will take many iterations before the Center of Gravity is reached.
Calculate the resultant pull force. Move the 'Center of Gravity' in that direction, at move distance.
Sum up all pull forces (vectors) to get the resultant pull force (vector) with a certain size (less relevant) and direction (most relevant) by summing up x and y components separately. For each customer pull force F: Fx = length demand vector × (customer_x − CoG_x)/(distance from customer to CoG), or shorter: Fx = demand × cosinus(angle F). Fy = demand × sinus(angle F).
Normalize this resultant pull force (a vector with origin at 0,0 and end point at x,y) by dividing x by its length √(x2 + y2) and y by its length. The vector keeps pointing in the same direction, but its length becomes 1, which makes it a unit vector.
Multiply x and y values of this unit vector with the step size to get the move vector representing move distance in x and y direction.
If the move vector's tail starts at the current 'Center of Gravity' position, then its head ends at the next 'Center of Gravity' position. So, add the move distance in x direction to the current x position of the 'Center of Gravity', and add distance in y direction to its current y position. This brings the next 'Center of Gravity' position.
Calculate the sum of weighted distances. If it increased, then divide the move distance by two.
This approach originates from the binary search algorithm - a.k.a. half interval search - to find the position of a target value within a sorted array. See half-interval search (wikipedia).
Optional: move the 'Center of Gravity' back to its previous position if the sum increased, so with each 'accepted move' the solution always improves (or remains equal, but never worsens).
Repeat steps 2 and 3 until the move distance becomes very small.
Then the Center of Gravity hardly changes anymore, and the sum of weighted distances converges.
The Center of Gravity may be in the middle of a lake or on top of a mountain.
Simulation 1 - process step by step
Press button Next process step to start the simulation.
Simulation 2 - initial versus optimal position
The animation shows the difference between inital position (white dot) versus optimized position
with a percentage costs improvement.
X,y on a flat plane (Cartesian coordinate system) becomes latitude,longitude on a globe (Spherical coordinate system). The algorithm involves summing up vectors with a length and an angle. The distance between two points on a globe is calculated with the Haversine formula, and the angle with a Bearing formula.
"No, it's not a flat plane."
Latitudes and longitudes in both formulas need to be expressed in radians = degrees × 𝜋/180.
Haversine formula - in 2 steps
a = sinus2((latitude_customer − latitude_Center of Gravity)/2) + cos(latitude_Center of Gravity) × cos(latitude_customer) × sinus2((longitude_customer − longitude_Center of Gravity)/2)
As-the-crow-flies-distance = 2 × atan2(√a , √(1-a)) × 6371. 6371 kilometers is Earth's mean radius.
Bearing = atan2(sinus(longitude_customer − longitude_Center of Gravity) × cosinus(latitude_customer) , cosinus(latitude_Center of Gravity) × sinus(latitude_customer) − sinus(latitude_Center of Gravity) × cosinus(latitude_customer) × cosinus(longitude_customer − longitude_Center of Gravity)
Bearing is measured against the vertical longitude axis, not the horizontal latitiude axis, so you need to swap the use of cosinus/sinus when calculating forces in x and y direction.
Applying the algorithm to Earth is done via a flat tangent space.
The globe with current 'Center of Gravity' location (white) and customer pull forces are transformed to a tangent space - a flat plane that touches the globe at the current 'Center of Gravity' location - respecting pull force lengths and angles. The next 'Center of Gravity' location (green) is computed on the tangent space applying the algorithm. This next location is mapped back to the globe. This green location then becomes white current location and the process is repeated (until the final location has been reached).
Algorithm
Weiszfeld's algorithm - see also Geometric median (wikipedia) - is simpler (but less intuitive) and works like this on an x,y plane:
Initialization: locate the 'Center of Gravity' at an initial (random) position.
Calculate each customer weight as demand divided by distance to 'Center of Gravity'.
Calculate the weighted average x,y of customers as the next 'Center of Gravity'.
Repeat steps 2 and 3 until the sum of weighted distances converges.
Differences between Single Center of Gravity and Weiszfeld's algorithm
Major difference between Single Center of Gravity algorithm and Weiszfeld's algorithm is that the Single Center of Gravity algorithm uses an explicitly controlled move distance that - indirectly - enables an advanced feature: you can limit the move range of predefined warehouses. The optimal location may then be somewhere at the border of this limited range and Weiszfeld's algorithm cannot handle this.
That difference is also the reason that Weiszfeld's algorithm converges approx. 10% faster.. Because, if the initial move distance is set too low, it will take many iterations to move a Center of Gravity to its final destination, so it is better to initialize it too high. But as a result, the first few iterations will often be useless overshoots (ignored - after which step size is divided by two - and then it quickly catches up with Weiszfeld's algorithm).
Centers of Gravity Calculator uses both algorithms
Centers of Gravity Calculator uses both algorithms: the faster Weiszfeld's algorithm as its default, and Single‑Center of Gravity algorithm in case of predefined warehouses with limited move range (and some other specific cases).
Algorithm
Below, 'Center of Gravity' and warehouse are used interchangeably.
A single run of the Multiple Center of Gravity locations algorithm does the following:
Initialization: locate each warehouse at a random location within the customer cloud.
(Re)assign each customer to its closest warehouse.
Move each warehouse to the Center of Gravity of its assigned customers. = apply Single Center of Gravity location algorithm / Weiszfeld's algorithm per warehouse
Repeat steps 2 and 3 until the sum of weighted distances converges.
Multiple runs are done to find the global optimum, as a run may get stuck in a local optimum. The more runs, the more likely the global optimum is found. Usually, this global optimum will then have been found multiple times as best solution. The warehouse locations of the best solution found are considered to be the Center of Gravity. But - especially with a higher number of warehouses - it may happen that two different warehouse structures bring an almost similar sum of weighted distances.
Similarity with K-means Clustering
The above algorithm is similar to K-means Clustering (wikipedia) used for cluster analysis in data mining and machine learning.
Animated explanation
The animations show what happens during a single run of the Multiple Center of Gravity locations algorithm. Customers are assigned to their closest warehouse, warehouses move to the Center of Gravity of their assigned customers, customer are reassigned, warehouses move, et cetera, until the final situation is reached where none of the customer assignments change anymore, and none of the warehouse positions.
Although - in the first three examples below - each run starts with different initial random locations, the solution found is the global optimum with a minimal sum of weighted distances.
Run 1 - global optimum (50 iterations)
Run 2 - global optimum (33 iterations)
Run 3 - global optimum (21 iterations)
But a run may get stuck in a local optimum, as shown below. Therefore, multiple runs need to be done to find the global optimum.
Run 4 - local optimum (32 iterations)
Beware of an overseas customer, far, far away
As seen in the previous section, calculating a single Center of Gravity location is not so much about distances as it is about pull forces and directions, finding the spot where all forces summed up together become zero.
An exceptional multiple Center of Gravity locations case in which distance may become "directly relevant" is a case in which one customer is located thousands of miles away from all others, on some overseas island that belongs/belonged to a country. Then one of the Center of Gravity locations may end up on top of that customer. But locating a warehouse over there would make no sense. So you better remove such customer from your input data, or relocate it to exit harbor or airport.
Underlying assumptions
A major underlying assumption is that transport cost = rate/kilometer × distance. This assumption is only partly valid. For instance, parcel rates are often distance independent within a region. Macro-economic imbalances cause direction-dependent rates. Different transport companies may have different rates for the same route because they have a different customer base that may enable efficiencies (or not).
From that perspective, it would be better to calculate with costs based on actual carrier rates. But most often you will not have transport rates for each and every possible warehouse location to every customer location. So then you have to rely on transport costs estimators.
Distances used are not actual road distances, but estimated road distances. Estimated road distance = as-the-crow-flies distances × distance circuity factor. An important reason for using as-the-crow-flies distances is because run-time would become too long when having to calculate (extremely) large amounts of road distances.
Note that from a cost perspective the fastest route is more relevant than the shortest route, as driver and truck cost are more time-related than distance-related. Google Maps retuns fastst route by default. Which is fine. But fastest route may depend on time of the day, day of the week, time of the year, roadworks, or vary between routes that are nearly-equivalent. So, even actual road distance might still be an estimation, to some extent.
Calculating Center of Gravity locations is not so much about distances as it is about pull forces and directions, finding the spot where all forces summed up together become zero, as explained in the section about the Single Center of Gravity location algorithm.
As distance estimation errors occur in each and every direction (one customer distance might be a bit too large, another a bit too small), errors tend to cancel each other out, and the Center of Gravity locations (indicative warehouse locations) become pretty accurate. The use of as-the-crow-flies distance is usually not an issue, if the road network is dense. Approximations are acceptable, and commonly used in network design software.
Broader supply chain network design perspective
Of course, transport costs are only a part of supply chain costs. The optimal number of warehouses and their locations are driven by many quantitative and qualitative factors such as (future) transport and warehousing space and labor rates, future demand (and supply), lead time requirements, inventory effects, supply chain risk/redundancy, contractual obligations, taxes, distance to parcel or logistics hubs, workforce availability/public transport connections, et cetera.
Nevertheless, it is common practice to run a Center of Gravity analysis to get a view on which logical warehouse locations to consider in a supply chain network design.
Add-ons
Default: Greedy algorithm
Centers of Gravity Calculator's default algorithm to handle capacity constraints is a superfast, greedy algorithm. Roughly described, it works like this.
Assign each customer (group) to a warehouse as if warehouse capacities are unlimited
Loop through all warehouse, and while the capacity of a warehouse is exceeded shift that customer (group) to that other warehouse that will increase the costs the least - and only if the customer (group) still fits in that warehouse if it is a warehouse earlier in the loop.
Greedy means that the solution may be sub-optimal, cost-wise. Capacities will not exceed 100% unless all set super-tight.
If predefined warehouses have limited capacities, then a - so called - transportation problem arises.
A transportation problem can be solved cost-optimally with the well-known Simplex method (LP). But it can be solved much, much faster with a combination of Vogel's approximation + MODI + Stepping Stone method that generates a cost optimal solution while respecing capacity constraints. This combination has been implemented in Centers of Gravity Calculator.
Descriptions of each separate method can be found elsewhere on the internet.
However, this method may create a cost-optimal solution in which a single customer receives from multiple warehouses (which happens as soon as a warehouse is utilized 100.00%). But Center of Gravity Calculator assumes 'single sourcing'. So, if a customer receives from multiple warehouses in the LP solution, then this customer gets assigned 'in full' to the warehouse that supplies the most. This non-optimal, post-processing-step to avoid 'multiple-sourcing' may cause utilization to exceed 100%, often by a marginal percentage only, as it involves few customers only.
But it may become worse, especially if your case contains few customers only per warehouse, or some exceptionally large customers. For example, if capacity of Birmingham is adjusted to 41470 in the demo case (only 8.7% of original capacity, so only few customers can be assigned to it), and the move limit of Madrid is adjusted to 9999 (instead of 200), then Birmingham's utilization becomes 131%. This is caused by a single large customer, as shown below.
In the underlying optimal LP solution customer 551 receives a quantity of 19480 from Birmingham and 13020 from WH03. As most comes from Birmingham, customer 551 is assigned to Birmingham. Birmingham capacity is now exceeded with 13020, making its utilization 131% (= 54760/41740) instead of 100.00% in LP solution. (If that customer is removed from Birmingham, then its utilization drops to 53%.)
Underlying optimal LP Solution
Customer_ID
Demand
Birmingham
Madrid
WH03
336
3200
3200
0
0
337
2880
2880
0
0
551
32500
19480
0
13020
Assigned in full to Birmingham
555
12840
12840
0
0
557
3340
3340
0
0
Total
54760
41740
0
13020
Centers of Gravity calculator reports which customers cause warehouse utilization to exceed 100%, so you can decide if you want to assign those manually to another warehouse, or split them in two.
Also note that LP optimization ignores customer groups. But LP optimization will only get activated if warehouses still exceed capacity, after first having tried to solve capacity issues at group level.
As the LP optimization truly minimizes costs, the solution may show less illogical/inefficient/crossing customer flows.
Continuous LP optimization or post-optimization only
You can choose between:
Continuous optimization:
LP continuously active, during whole process, for all runs. May increase total run time considerably.
Post‑optimization only:
LP applied for best run only, afterwards. It will not affect Center of Gravity locations, but may prevent illogical customer flows.
Run with and without LP optimization and compare outcomes
Of course, you can simply run with and without LP optimization, and compare solutions. Usually, they do not differ that much.
Suppliers come with supplier transport costs. Including suppliers means that Center of Gravity locations should move towards suppliers. But only as long as total transport costs decrease.
Besides customers, suppliers also pull Center of Gravity locations, but in 'opposite' direction, and usually relatively less hard, as supplier transport is relatively less expensive than customer transport. See section Parameters & Constraints - Transport rates.
Centers of Gravity Calculator supports 4 supply options that determine how supply flows are constructed.
Each supplier delivers to closest warehouse only
i
LP optimized supply flows - with auto-sized suppliers
i
Each supplier delivers to each warehouse
i
Each supplier delivers to each warehouse via closest warehouse
i
Each supplier causes (multiple) flows to warehouses. Each flow translates into a pull force (supplier or inter-warehouse transport rate weighted) comparable to a customer pull force (customer tranport rate weighted) but pulling in 'opposite' direction. All forces are fed into the Single Center of Gravity algorithm that determines the position that minimizes total transport costs.
Besides, the customer assignment procedure of the Multiple Center of Gravity locations algorithm (step 2) takes into account (expected) supply-side transport costs when determining to which warehouse a customer gets assigned to.
A customer group is used to force all customers within a group to be delivered by a single warehouse only (single-sourcing). The group is assigned to the warehouse that comes with the lowest sum of weighted distances for this group of customers. Underlying cost calculation is still done at individual customer level.
What group stands for, is up to you to decide. For example, a group can be used to group customers per country, so each country is delivered from a single warehouse only.
A fixed customer-warehouse assignment takes precedence over a customer group. Warehouse capacity limits may cause a customer group to 'break'.
A completely different algorithmic approach is one in which a large set of possible warehouse locations is pre-generated, after which the K best ones are selected (see Combination - wikipedia).
+ Advantages are that the warehouse-customer cost matrix can be based on various transport rate structures and accurate road distances, and that it may take into account binary-fixed and variable warehousing costs as well. − Disadvantages are that (much) more input is required, that there is a risk that the set of possible warehouse locations does not contain optimal locations, and that runtime may become an issue.
Which brings us to the next section, Select best warehouses, that uses this approach.
Select best warehouses goal value
The "Select best warehouses" routine selects those warehouses from a predefinced set that minimize the goal value, being the sum of customer plus supplier transport costs + warehouse binary‑fixed costs + warehouse variable handling costs.
Customer transport cost if customer C is delivered from warehouse W = demand qty of customer C × as-the-crow-flies-distance between warehouse W and customer C × distance circuity factor × customer transport rate (= transport cost/distance unit/qty unit).
Distance is based on coordinates of the predefined warehouse. (So, not the coordinates of Center of Gravity in case a warehouse was allowed to move. You may want to copy Center of Gravity coordinates back into your predefined warehouse table.)
Distance includes detour via a border crossing point if applicable.
You can adjust cost input via section
"Override warehouse-customer transport costs input (optional)"
.
Supplier transport cost (optional) for each supplier S = supply qty of supplier S × as-the-crow-flies-distance between warehouse W and supplier S × distance circuity factor × supplier transport rate * warehouse qty/total demand. This is conform supply option 3.
Warehouse binary-fixed costs (optional) of warehouse W are its fixed costs and apply only if warehouse W is opened.
Warehouse variable handling costs (optional) if customer C is delivered from warehouse W = productsum(customer C's whs quantities × warehouse W's variable rates). Note that customer field Demand (= transport qty) is irrelevant in this formula.
How to activate constraints
Constraint
Supported
How to activate
Predefined warehouses
yes
Always active (regardles constraint setting).
Fixed customer-warehouse links
yes
By checking constraint in section Parameters & constraints - Constraints
Capacity limits
yes
By using Greedy solver or LP solver (not by checking constraint).
Customer groups
no
Suppliers
yes (partly)
By checking constraint in section Parameters & constraints - Constraints. Supply option 3 is activated in background. Other options not supported.
Border crossing points
yes
By checking constraint in section Parameters & constraints - Constraints.
Select best warehouses algorithms - Summary
The selection of best warehouses is handled by a combination of two independent procedures, each having three solver options. A. Warehouse combinations generation procedure generates valid warehouse combinations (= open/close decision for each warehouse), with valid meaning that the number of warehouses to select (per group) is respected and each must-be-included warehouse is indeed opened.
K-means Clustering solver: generates only "promising" combinations, so solves fast but may bring sub-optimal open/close decisions, though this rarely happens.
Superfast Selection solver: generates only "promising" combinations, so solves fast but may bring sub-optimal open/close decisions, though this rarely happens.
Enumeration solver: generates all possible combinations, so solves relatively slow, but optimally.
B. Warehouse capacities procedure assigns each customer to an open warehouse (given open/close decisions) while respecting warehouse capacity limits and minimizing costs.
Ignore/not applicable: capacity limits are not applicable so each customer can simply be assigned to the open warehouse that brings the lowest costs.
Greedy solver: solves the capacity problem fast, but may produce sub-optimal customer assignments.
LP solver: solves the capacity problem relatively slow, but optimally (if a single customer could be served from multiple warehouses).
Best is to use Enumeration Solver (plus LP solver in case of warehouse capacity constraints)..
However, run time may increase drastically. Especially LP solver is relatively slow (see its explanation further below).
Besides, Enumeration Solver speed may become unpredictable if used with LP solver. For example, running the demo case, the process starts slowly, because the first two warehouses out of 24 have capacity limits. Once none of these two is part of a warehouse combination - when 23.9% of 2024 combinations have been processed, and all 1540 possible combinations of 3 warehouses out of the last 22 warehouses on the list are still to be processed - then the run is suddenly finished within the blink of an eye, because then all customers can simply be assigned to the closest/cheapest warehouse without having to solve a transportation problem.
If a run takes too long, then simply stop it (and ignore outcome in case of Enumeration Solver, as that solver lacks a mechanism to stear towards the best combination of warehouses) and use another combination of solvers.
You may want to run other solvers first, to get a quicker result that very often will be optimal.
Warehouse combinations generation
Problem-specific solver. Performs a K-means-Clustering-like procedure.
Single run
Initialisation: for each group, select a random warehouse within the group and open it, until the amount of warehouses to be opened for this group has been reached.
As long as costs still decrease, keep looping through all open warehouses, and
Close this open warehouse.
Find the closed warehouse within this group that will decrease costs the most (or increase the least), if it is opened.
Open that warehouse. (It might be the same warehouse as the one that just has been closed.)
Multiple runs
Perform the single run procedure multiple times (each starting with different randomly selected warehouses).
Often, this best solution will have been found in several times of those runs. (Just like the Center of Gravity calculation procedure that will find the same solution several times doing N runs.).
This solver found optimal solutions in almost all tests, or else 0-2% worse. The chance of missing out the optimum becomes higher, if the number of runs is set lower.
Speed is usually in the same ballpark as Superfast Selection Solver. But if a high number of warehouses and (relatively) high number to be opened is applicable, then the limit on number of runs makes it finish faster than Superfast Selection Solver.
Problem-specific solver (custom-built). Roughly described, it works like this:
Open 1 by 1 the next best warehouse, until the amount of opened warehouses exceeds the amount to be opened with X. Then close X worst warehouses 1 by 1.
Swap N open warehouses with N closed ones (within 1 to N groups). Run for all possible swaps, enumeration-wise. Revert swap if solution got worse.
For example, it solved a 145 million combinations case optimally in 0.1 second, versus 5 minutes Enumeration Solver. It found optimal solutions in almost all tests, or else 0-2% worse.
Generates all possible valid warehouse combinations, so it will always find the optimum. But the higher the number of permutations, the longer the run time. It may even take hours. Reason to develop the other two solvers, that run quickly and will almost always find the optimal solution, however without guarantee. Because all combinations are generated and evaluated, the Enumeration Solver can produce a "top 20" list of warehouse combinations.
Warehouse capacity limits handling
If warehouse capacities are to be ignored / not applicable then each customer can simply be assigned to the open warehouse that comes with the lowest costs. (There is no need for a solver.)
Greedy Solver runs a fast, greedy algorithm that works likes this:
Assign customers to open warehouses as if warehouse capacities are unlimited
Loop through all open warehouse, and while warehouse capacity is exceeded shift that customer to that other open warehouse that will increase the costs the least (and only if the customer still fits in that warehouse if it is a warehouse earlier in the loop).
The solution may become sub-optimal.
If open warehouses have limited capacity, a transportation problem arises.
Such problem can be solved optimally with the Simplex method (LP). It can also be solved optimally, and much, much faster, with a combination of Vogel + MODI + Stepping Stone method, therefor this combination has been implemented.
Detailed descriptions of each separate method (standard as such) can be found on the internet.
For a demo case that shows the speed difference, see Transportation problem solver
Note that if a customer receives from two warehouses in the optimal transportation problem solution (in which warehouse utilization never exceeds 100%), then this customer gets assigned in full to the warehouse that supplies the most. This non-optimal, post-step may cause utilization to exceed 100%, usually a little only as it will involve few customers only.
Or click button 'Import | Export' (above each table), copy data (tab or semicolon separated) into textarea, click button again. Or enter manually in table itself.
You have not logged in. Customers changes are ignored. Create an account to run with your own customers data.
In demo mode you can adjust all other input tables, parameters & constraints, and run the software. See section Demo guide.
Import | Export textarea
i
Highlight customer on map by clicking on a table cell. In Map settings you can set customer size factor.
Only fields Customer_ID, Latitude, Longitude, Demand are obligatory. All fields are explained in user manual section Customers.
Try to limit the number of customers (even though 100,000 is possible)
More data records does not necessarily make a model more accurate. Most models contain less than 5,000 customers. The smaller a model, the faster it runs. Press Aggregate for customer reduction potential. Section Aggregation suggestions provides more info and examples.
All fields are explained in user manual section Warehouses.
Import | Export textarea
i
All fields are explained in user manual section Suppliers.
Import | Export textarea
i
All fields are explained in user manual section Border crossing points.
After data entry, check relevant constraints, otherwise your input data will be partly ignored!
This is done in section Parameters & constraints - Constraints, as is also explained in user manual section Constraints.
i
i
i
i
i
Closest city is based on a database containing cities with at least 15,000 inhabitants.
Display
i
using a
i
Read user manual section Logical steps - Add suppliers for more info. Options 1/3/4 can be mixed if set at individual supplier level.
Non-unique products
Unique products
Also set Transport rates
Read user manual section Transport rates for more info.
i
i
Shipment size
% FTL
See curve % FTL costs
Cost ratio
i
Costs/km/qty
Full Truck Load
100.00%
100.00%
1.000000
Customer
Supplier
Inter-warehouse
Center of Gravity locations depend on ratio supplier rate/customer rate =
Transport costs curve
i
Cost factor as % FTL cost
Shipment size as %FTL
Point
X (as %)
Y (as %)
Start point (P0)
Start control point (P1)
End control point (P2)
End point (P3)
Some point on the curve
Animation of Bezier curve construction
You may also drag the red control points in chart itself.
Read user manual section Constraints for more info.
→ Also select supply option
Calculate Center of Gravity locations first, before using this section that helps to estimate the yearly customer delivery mileage of an owned truck operation. Center of Gravity locations and customer assignments are used as input for its calculations. It determines an average roundtrip per warehouse - based on a.o. delivery area shape and size per warehouse (based on customer locations) - which then brings yearly mileage per warehouse, thus total yearly mileage.
i
i
i
i
i
Sum of area size(s) (square km)
i
i
Avg Inter Drop Distance
i
Avg deliveries per roundtrip
i
Avg roundtrip length
i
Sum of yearly roundtrip kilometers
Sum of yearly roundtrip miles
i
Demand beyond reach
Customers beyond reach
Above fields remain empty, because an infeasibility error is encountered at a warehouse.
To calculate more precisely, on a daily basis, with actual roundtrips per warehouse being constructed, use Fleet Mileage Calculator
Centers of Gravity Calculator goal value assumes that transport costs are linearly, perfectly positive correlated to weighted distance, as if 1 customer delivery means 1 trip with 1 drop only, and as if costs are fully determined by distance driven. In reality, multiple drops are done in a single roundtrip, and trip costs are not only costs of driving, but also costs of loading and unloading (see picture on the right).
Centers of Gravity Calculator minimizes the sum of weighted distances. This is the same as minimizing the weighted average distance. That distance is the distance from warehouse to the first customer in a trip, and also from last customer back to warehouse.
It does not equal the distance between customers on a trip. That inter-drop distance depends on the number of drops and delivery area size. So, trip length - and costs of driving - is only partly determined by weighted average distance. And costs of (un)loading is not related to distance.
Because transport costs are only partly determined by weighted average distance, X% change of goal value does not mean X% change of transport costs. To estimate future scenario transport costs you may combine your actual baseline transport costs with goal value change and some dampening factor, as shown below.
Baseline
Future scenario
Baseline transport costs from your financials
USD 12,000,000
Goal value Centers of Gravity Calculator
10,000,000
9,000,000
Goal value change (as %)
-10%
Dampening factor (value assumed at 0.50)
0.50
Goal value change × dampening factor
-5%
Transport costs effect
- USD 600,000
Future scenario costs
USD 11,400,000
Or use the sum of yearly roundtrip kilometers of previous section to estimate cost effects.
Constraints settings
Minimum goal value
i
Current goal value
Weighted distances
i
Create backup file
Service level distance metrics
Parameter
Value
Center of Gravity filter (include)
All
Weighted avg. customer distance
673 km
Min. customer distance
9 km
Avg. customer distance
653 km
Max. customer distance
2783 km
Number of customers assigned
588
• Lead time distance limit (generic)
750 km
• Customers within lead time distance
392
• Demand within lead time distance
63.3% of total demand
Service level distance table
Distance bin width (km)
10
20
25
50
100
Distance
Demand cum
Demand
Customers cum
Customers
# Customers
Service level metrics and table are also found in the output reports.
Service level distance chart
Copy chart
Distance = estimated road distance = as-the-crow-flies distance x circuity factor, set in section Parameters & constraints - Distance.
Copy reports
Tab separated
Decimal point
Semicolon separated
Decimal comma
Summary
i
i
i
Center of Gravity locations
i
i
i
i
Customer assignments
records.
i
i
i
Supplier flows
Inter-warehouse flows
Service level distances
Warehouse capacity overflow
i
Read input data
Number of warehouses to select
Warehouse group
a
b
c
d
e
f
g
h
i
j = must‑be‑included
Number of warehouses in group
Number of warehouses to select
Number of possible warehouse combinations = ...
Solvers selection
Best is to use Enumeration solver. For more info, read Select best warehouses algorithms.
Warehouse combinations generation (open/close decision for each warehouse)
K-means Clustering
Superfast Selection solver
Enumeration solver
Warehouse capacities (and assignment of each customer to an open warehouse)
Ignore / not applicable
Greedy solver
LP solver+
You may override the warehouse-customer transport costs input as calculated by the software with your own transport costs based on your own costing method / on actual rate tables / on actual road distances (see Batch Driving Distances Calculator).
Enter a C × W matrix (C customers top to bottom × W warehouses left to right) in below text area with each matrix cell containing the total transport costs to deliver the total demand of customer C from warehouse W.
Uncheck constraint "Fixed customer-warehouse assignments" in section Constraintsif you no longer want to constrain assignments.
Press Clear if you no longer want to override.
i
Display selected warehouses only
i
i
Override warehouse-customer transport costs: activated. If you no longer want to override, then press Clear in override section.
Copy reports
Tab separated
Decimal point
Semicolon separated
Decimal comma
Summary
Selected warehouses
i
Customer assignments
Enumeration solver - Top X warehouse combinations
Raw LP solution quantities
LP solution quantities fo each customer (top to bottom) for each selected warehouse (left to right) that bring true minimal costs, and respect capacities fully (100.00% max).
This LP solution may contain a few customers that are supplied by more than one warehouse.
In a non-optimized post-step, those few customers are assigned to the warehouse that supplies the most (single sourcing), which brings the assignment report above.
Reports appear after running.
Your data stays on your computer. You can collaborate via exchange of a scenario file.
Export scenario file
Press Export button. Email file to your coworker.
Import scenario file
Save file from coworker on your computer. Press Import button.
Press Save in section Calculate to save imported data in memory.


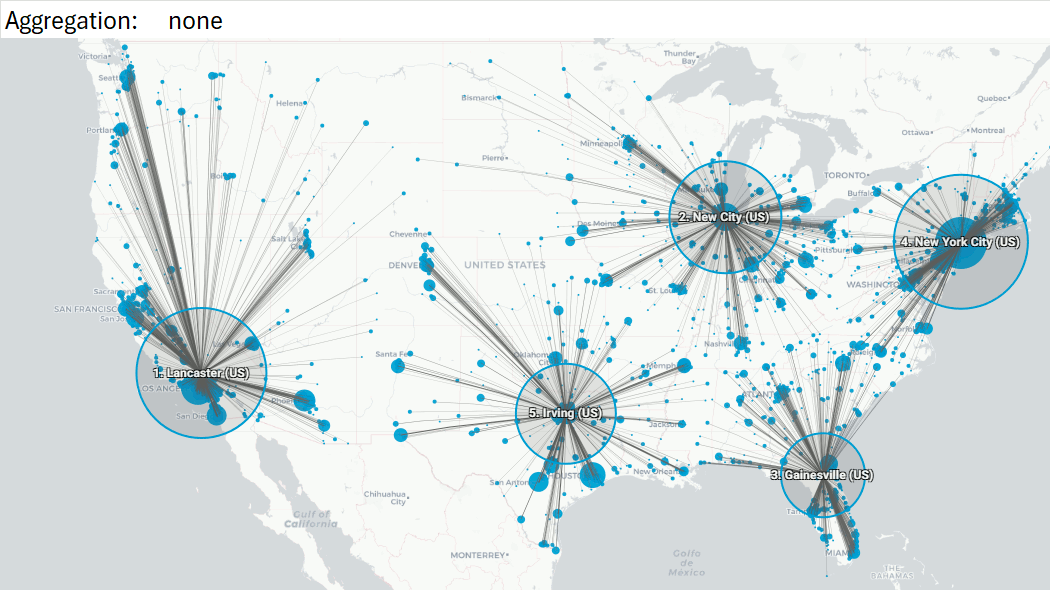
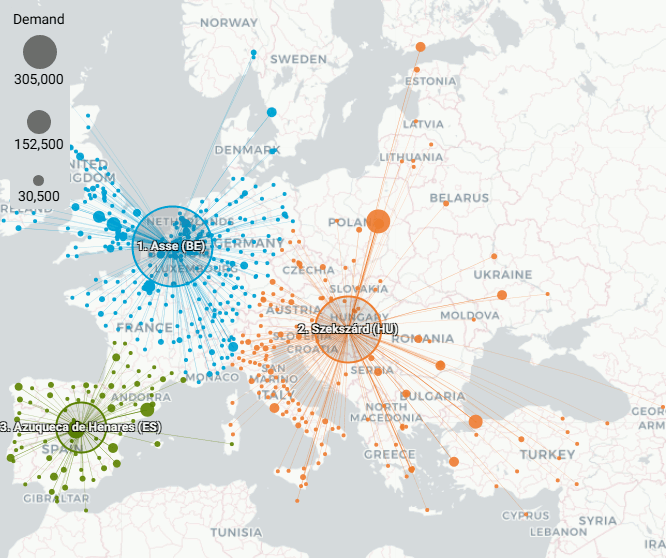
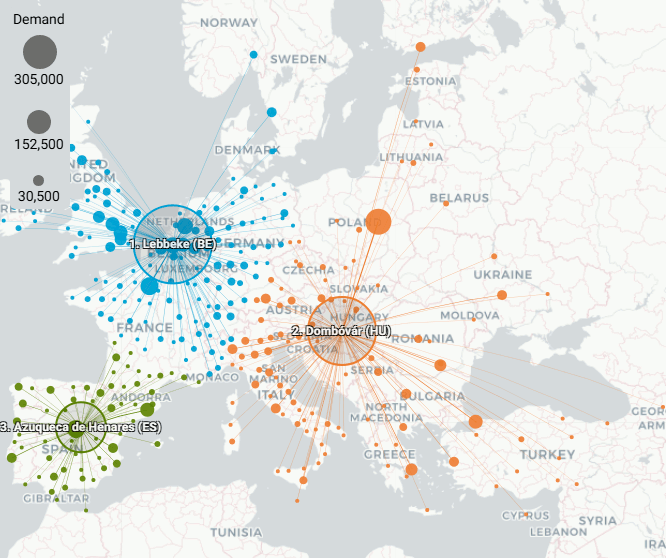


 The globe with current 'Center of Gravity' location (white) and customer pull forces are transformed to a tangent space - a flat plane that touches the globe at the current 'Center of Gravity' location - respecting pull force lengths and angles. The next 'Center of Gravity' location (green) is computed on the tangent space applying the algorithm. This next location is mapped back to the globe. This green location then becomes white current location and the process is repeated (until the final location has been reached).


